 Build faster with AI — Get started with the Nium MCP Server
Onboarding Forms
Onboarding Forms are secure, Nium-hosted web forms that guide your corporate customers through KYB and compliance steps — so you can onboard customers without building or maintaining a custom onboarding UI.
This form is helpful for clients that:
- Need faster go-to-market with limited engineering bandwidth
- Want Nium to manage the form experience, validations, and regional compliance requirements
- Are expanding into multiple countries without rebuilding onboarding flows
- Want to reduce errors, RFIs, and back-and-forth with customers during onboarding
If you need full UX and workflow control, or handle high onboarding volumes with dedicated engineering capacity, use Nium's Onboarding APIs to build a custom integration instead.
Overview
To onboard corporate customers using Onboarding Forms, clients:
- Invite the customer to onboard by sending or embedding the Onboarding Form link.
- The customer completes the Nium-hosted form, including business details, stakeholder information, and document uploads.
- Nium handles KYB, KYC, and compliance verification.
- You track progress and outcomes via webhooks and the Nium API.
- If Nium's compliance team needs additional information, an RFI is raised — customers respond using the RFI Form.
Key features
Onboarding Forms are built with regional regulatory requirements in mind. Nium manages field logic, validations, and compliance alignment — you only need to track customer progress and outcomes.
Other features include:
- Secure, expiring form links.
- Email-based one-time password (OTP) verification.
- Save-and-resume capability — customers can complete the form across sessions.
- Review and confirmation step before submission.
- Integrated KYB and KYC flows, including automatic database verification in supported regions.
- End-to-end application tracking via webhooks.
Responsibilities
| Feature | Client | Nium |
|---|---|---|
| Customer invitation | X | |
| Branding (logo) | X | |
| Form experience and validations | X | |
| KYB/KYC execution | X | |
| Compliance decisions | X | |
| Application status tracking | X |
Branding
You can add your organization's logo to the Onboarding Form for a consistent customer experience.
Your logo appears at the top left corner of the form, replacing the Nium logo shown in the default view. Provide your logo to your Nium account manager during initial setup.
Prerequisites
Before integrating Onboarding Forms:
- Your client account must be onboarded in Nium. You need your
clientHashIdand API key. - Hosted Components must be enabled for your account. Contact your Nium account manager or Nium Support to enable and configure this feature.
Onboard customers with Onboarding Forms
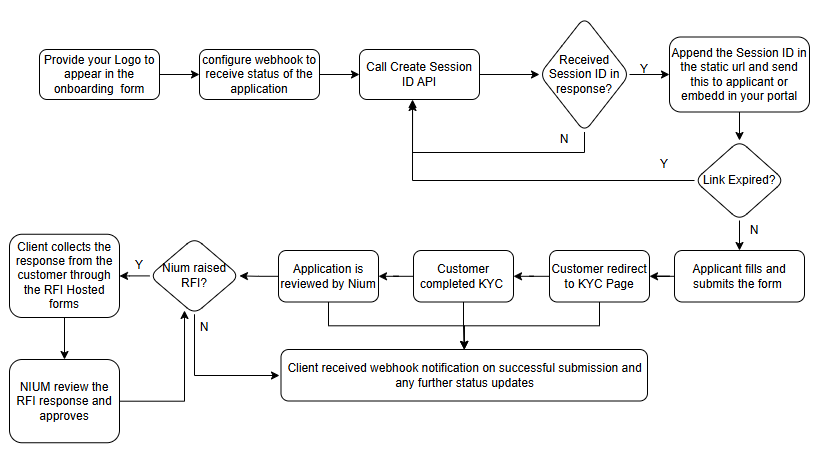
Step 1: Request access
Contact your Nium account manager or Nium Support to enable Onboarding Forms for your account. Provide your logo during this step — it appears at the top left corner of the form.
Step 2: Set up webhooks
Integrate with the Customer Status webhook to track application status updates. Use the externalId to correlate status changes back to your customer records.
Step 3: Create a session
Use the Create a Session request to generate a sessionId. The sessionId securely binds the customer's session to Nium's hosted form.
Request example
curl --location --globoff 'https://gateway.nium.com/api/v1/client/{clientHashId}/sessions' \
  --header 'Content-Type: application/json' \
  --header 'x-api-key: {x-api-key}' \
  --data '{
    "featureType": "customer_onboarding_form",
    "clientHashId": "{clientHashId}",
    "externalId": "{your-customer-reference-id}",
    "integrationType": "standalone",
    "expiry": "2026-12-31T23:59:59+00:00",
    "rollingDurationMinutes": 30,
    "email": "{customer-email}"
  }'
| Field | Type | Required | Description |
|---|---|---|---|
featureType | String | Required | Set to customer_onboarding_form for Onboarding Forms. |
clientHashId | String | Required | Unique identifier of your client account. |
externalId | String | Required | Your internal identifier for the customer. Used to correlate webhook status updates. |
integrationType | String | Required | embedded to display the form inside your portal. standalone to open in a new browser tab. |
expiry | String | Optional | Date and time the session expires. Format: yyyy-MM-dd'T'HH:mm:ssXXX. |
rollingDurationMinutes | Integer | Optional | Minutes of inactivity before the session expires. Minimum: 1. |
domain | String | Conditional | Required when integrationType is embedded. Must match the domain where the form is embedded. |
onBehalf | boolean | Yes | Indicates whether the client accesses the form on behalf of the customer. |
email | string | Conditional | Required when onBehalf = true. Used for OTP authentication. |
Successful response
{
  "sessionId": "e40e8072-7654-474b-ae31-c21a39c206ec",
  "externalId": "your-customer-reference-id",
  "featureType": "customer_onboarding_form",
  "metadata": {
    "integrationType": "standalone",
    "onBehalf": false,
    "email": "customer@example.com",
    "clientHashId": "a8734b87-f6e6-4fe1-95ed-b41a00104f64"
  },
  "status": "active"
}
Pass the sessionId to the static Onboarding Form URL:
- Production:
https://nformify.nium.com/customers/initial-enquiry?sessionId= - Sandbox:
https://nformify-sandbox.nium.com/customers/initial-enquiry?sessionId=
Step 4: Send or embed the form
Surface the full URL (base URL + sessionId) to your customer:
- Standalone: Send the link via email, SMS, or in-app notification. The form opens in a new browser tab.
- Embedded: Embed the form directly in your portal or dashboard using the
embeddedintegration type.
Step 5: Customer completes the form
The customer completes the form in the following order:
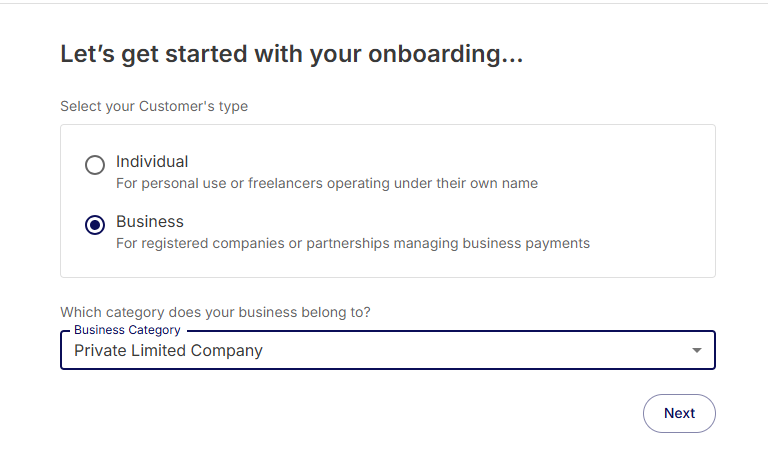
1. Choose customer type
The customer selects their business type to begin the onboarding enquiry.
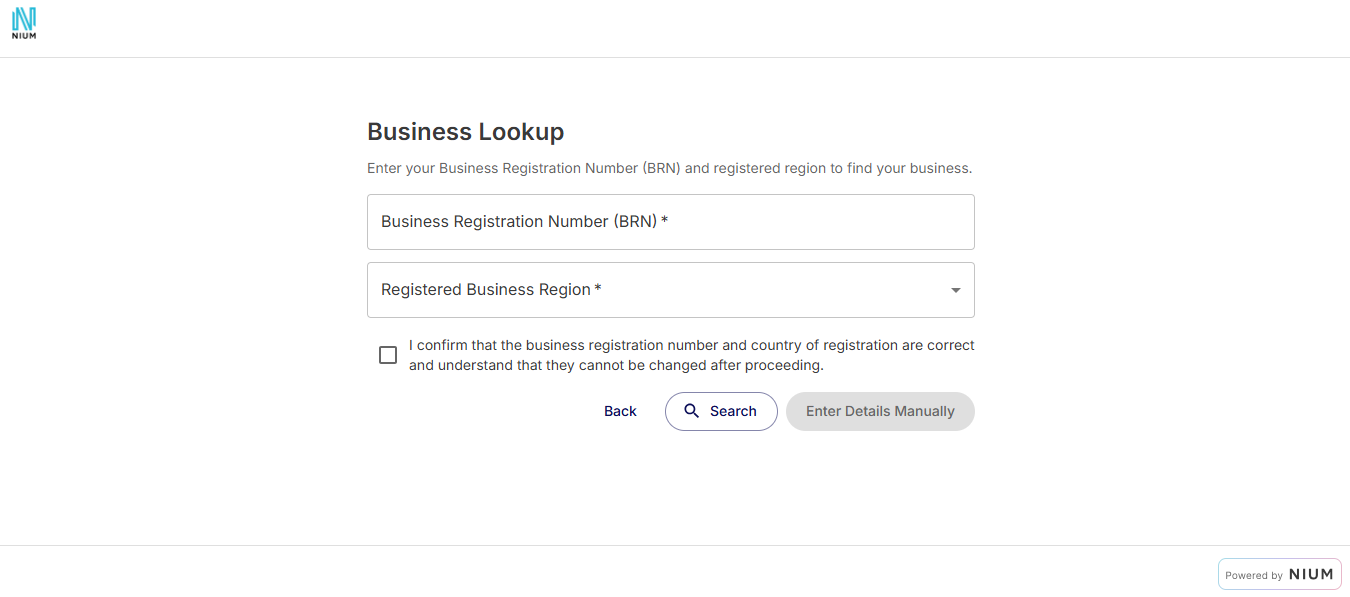
2. Complete initial enquiry
The customer enters their business name and registration number. Nium uses this to auto-fill business and stakeholder details where available.
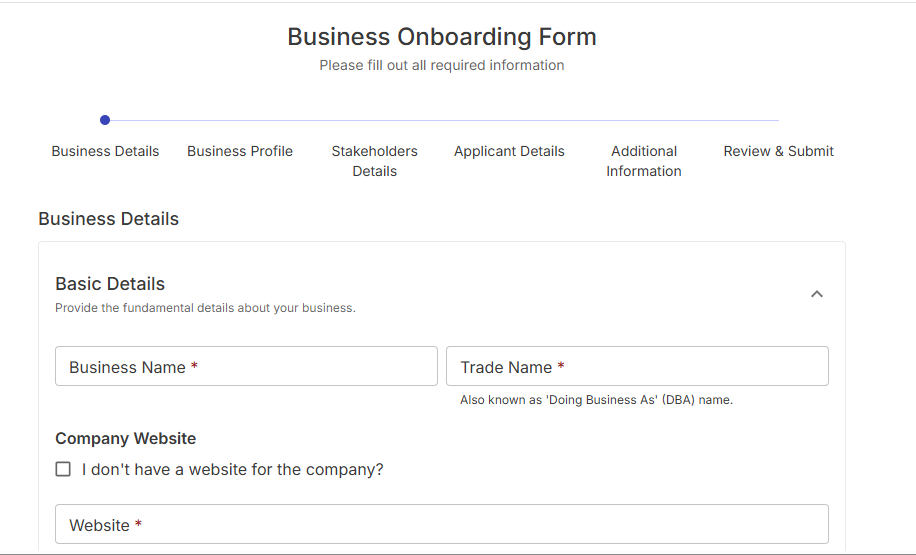
3. Complete the form
The customer reviews and confirms business details, then enters information for all key stakeholders — Ultimate Beneficial Owners (UBOs), shareholders, directors, and signatories — and uploads required supporting documents.
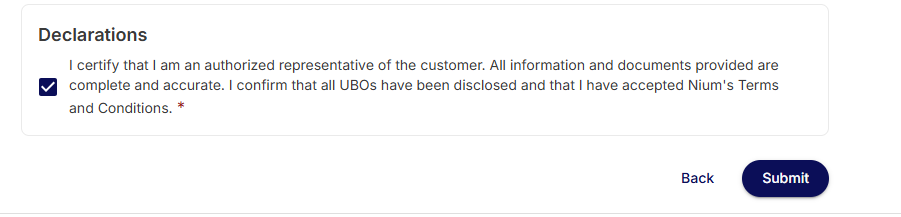
4. Accept terms and conditions
The customer reviews all entered details and accepts the terms and conditions before submitting the application.
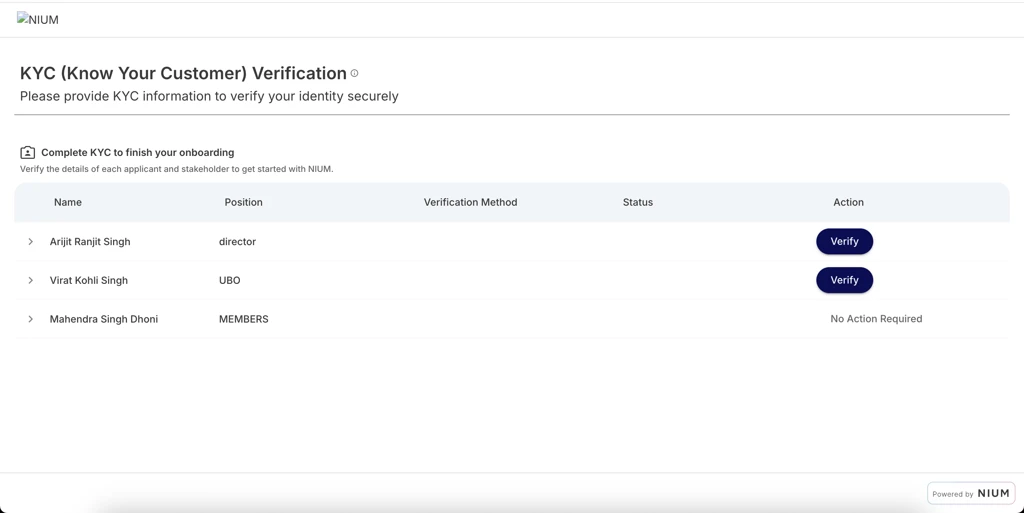
5. Complete KYC verification
After submission, the form redirects to the KYC verification step. You receive a webhook with subStatus: awaiting_kyc. Once all stakeholders complete KYC, you receive a webhook with subStatus: under_review.
In supported regions, KYC is completed automatically via database verification — no further action required from the customer.
Step 6: Handle RFIs
Nium's compliance team reviews the submitted application. Progress is communicated via webhooks. If additional information is needed to approve the application, Nium raises an RFI.
Provide your customer with the relevant RFI Form link to respond. The review process is complete once all RFIs are resolved and the application status updates to Clear. After this, the customer can start initiating transactions.
Next steps
After a customer completes the Onboarding Form and the application status reaches Clear, you can:
- Configure the customer's wallet and payment settings via the Nium API.
- Contact your Nium account manager to confirm any additional setup required before the customer goes live.
- Monitor ongoing application status using the Customer Status webhook.