Using the Portal
The Nium Portal provides all the tools you need to create, fund, and manage prepaid and balanceless cards.
Provide information about funding sources
In the web app, you can provide information about your funding source(s) for your funding accounts.
Nium uses this information to give you deposit instructions and to manage withdrawals.
Add money to funding accounts
You can load funds onto one or more virtual cards with the Nium API or in the Nium Portal. Any cards you create and load are immediately available for use. We strongly suggest you use the automated clearance feature as cards are automatically deleted after the maximum defaulted clearance date is reached with any extra funds being transferred back to your funding account.
Monitor funding accounts
Your operations team can track the history of funding account balances and activities through Nium’s APIs or web app.
Create and load cards
You can load funds onto one or more virtual cards with the Nium API or in the Nium Portal. Any cards you create and load are immediately available for use. We strongly suggest you use the automated clearance feature so that all the cards you create will be automatically deleted on a specific date. By doing so, any extra funds on used or lost cards will be automatically transferred back to your funding account.
Track the history of virtual card activities
Nium’s APIs and web app provide you with a complete history of card activity, including balances and transactions. Automated card activity notifications ensure tight integration with your existing systems.
Managing your company account
You can manage users and access rights in the Nium Portal.
| Sign in | https://payments.nium.com/ixsol-business/unprot/common/auth/'yourdeploymentname'/login.html |
| Manage your company account | Your username > Business Details |
| Manage users | Users > Manage Users |
| Manage access rights | Users > Manage User Groups |
Funding accounts
Nium has two types of funding accounts: pre-funded and credit.
Pre-funded accounts are limited to the amount of money you have added to your accounts.
Credit accounts have an agreed limit, which Nium sets. Credit accounts are only available to companies that have credit agreements with Nium.
📘 NOTE
Credit is a custom feature and is dependent on your specific terms and conditions. Please contact your account manager if you want to apply for credit.

You can perform the following operations in the web app:
| Create funding sources | Funds > Linked Bank Accounts |
| Create funding accounts | Funds > Funding Accounts |
| Add money to funding accounts | Funds > Funding Accounts |
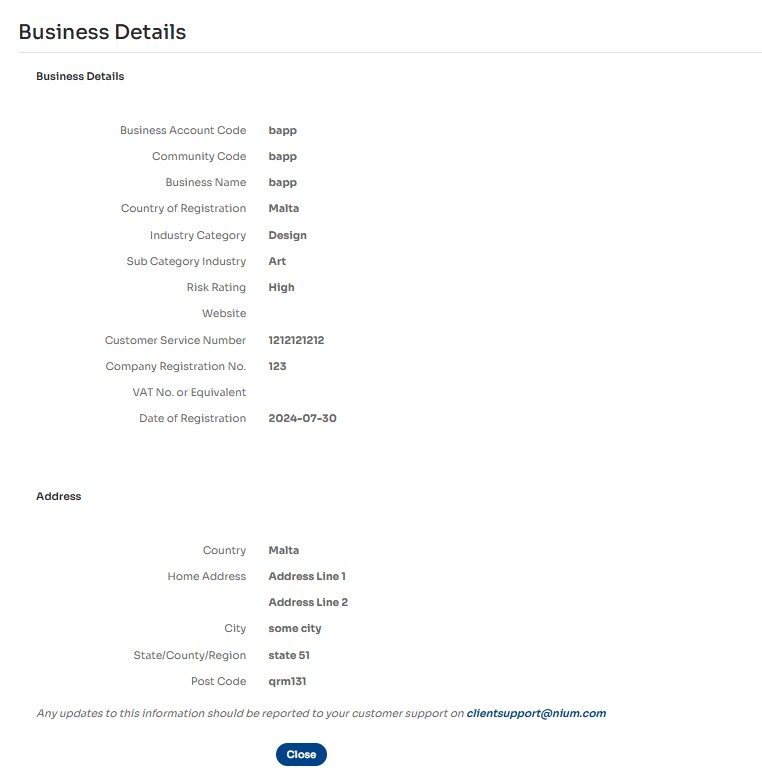
Account Setup
Our Client Delivery team sets up a company account using the details you provide during the onboarding stage. To view this information in the web app:
- Select your
username> Business Details.
Accessing the Nium Portal
You can access the web app in any web browser. To sign in, go to https://console.nium.com/business/unprot/common/auth/'yourdeploymentname'/login.html, where yourdeploymentnameis your Business Identifier defined at time of onboarding as part of the Deplyment Name
📘 NOTE
The exact URL you should use is provided to your team during onboarding.
Alternatively, you may receive an email that invites you to register. In this case, follow the instructions in this email.
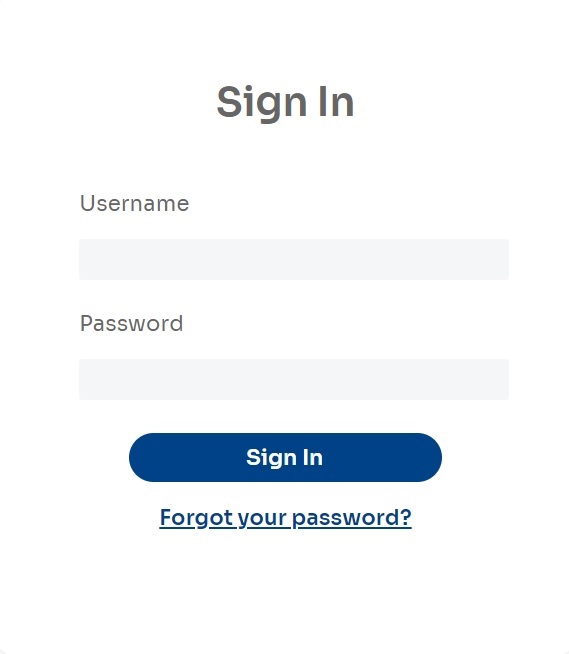
- Enter your credentials and select the Sign In button.
- Enter the 6-digit code generated by your TOTP authenticator.
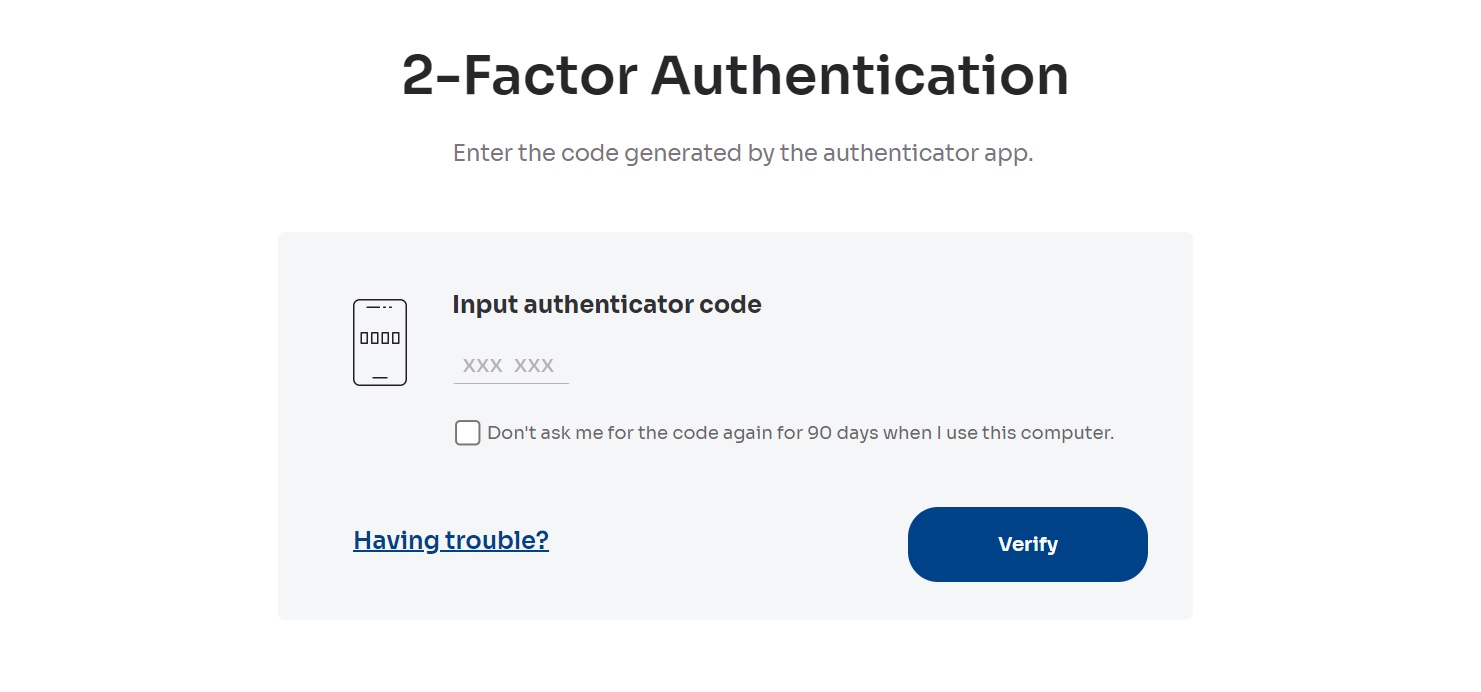
- Select the Verify button.
- To sign out of the web app, select the Sign Out option in the top right corner menu on any page.
You can create user accounts for other people in your organization at a later stage
📘 NOTE
Optionally, to access your account without the need to enter the TOTP authentication code for the next 90 days, you can mark a browser as trusted by selecting the Don't ask me for the code again for 90 days when I use this computer option. After 90 days, you’ll need to supply the TOTP authentication code.
Defining funding sources
You add money to a funding account from a funding source, such as a bank.
Before you can add money to a funding account, you must define a funding source. Once completed, you can:
- Add money from a funding source to a funding account
- Withdraw from a funding account back to the funding source
To learn how to create a funding account:
Linking a bank account
You must link a bank account to add money to a funding account from a bank account in the Nium Portal.
- Select Funds > Linked Bank Accounts
The Linked Bank Accounts page is displayed. - Select the Link Account button
The Link Bank Account page is displayed
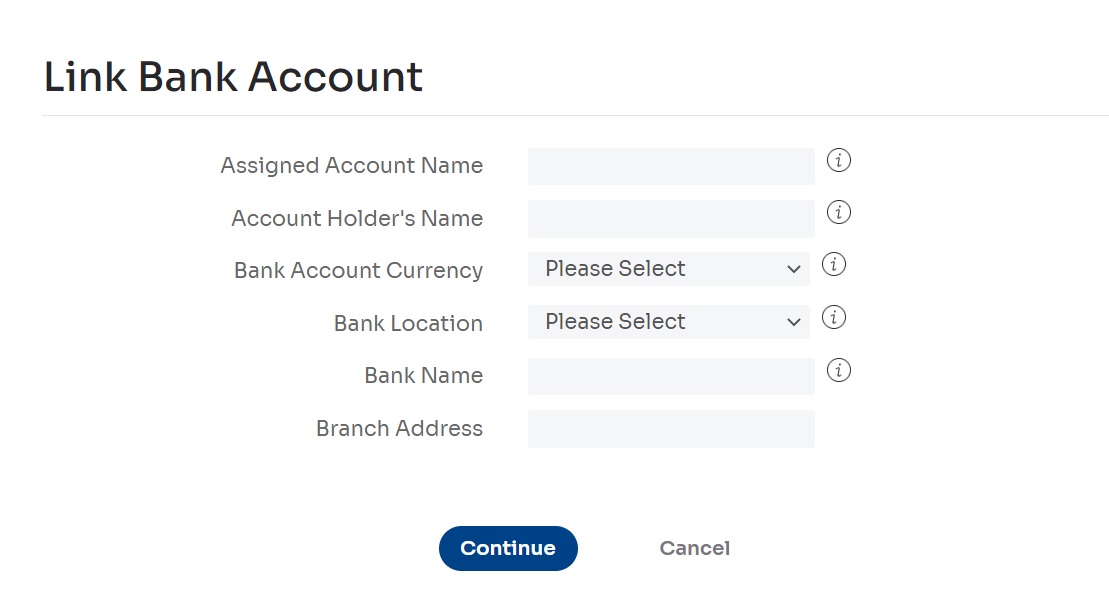
- Fill in the form fields. Some fields may be available only for some bank locations.
- Enter an Assigned Account Name: This is your bank account name that will be identified in the web app.
- Enter the Account Holder's Name: This is the bank account owner's name as provided to the bank. If you don't know this name, check your bank statement.
- Select the Bank Account Currency: This is the currency of your bank account.
- Select the Bank Location: This is the country where your bank branch is located.
- Enter the Bank Name: This is the full bank name.
- Enter the Bank Address: This is the street address of your bank.
- Enter the Branch Address: This is the street address of your bank branch.
- Enter the IBAN Number: This is the International Bank Account Number.
- Enter the Bank Code: This is the code used to uniquely identify your bank in its country of origin.
- Enter the Branch Code: This is the code used to identify your bank branch in its country of origin uniquely.
- Enter the Account Type: This information helps identify the type of account.
- Enter the Account Number: This is the account number used within your country of origin.
- Enter the SWIFT Code: This international standard code identifies your bank branch but not your account. If you don't know your bank branch’s SWIFT code, check your bank statement or contact your bank.
📘 NOTE
Make sure that you provide the full IBAN number including the two-letter country code it begins with.
📘 NOTE
Additional fields may appear after you select the Bank Location.
- Select the Continue button to create a record for your bank account in the web app.
A Bank Account Linked confirmation page with your configured bank account details is displayed.
👍 IMPORTANT
For your security, Nium needs to verify your account information. When you link a new bank account, please send a bank statement to the Compliance Team at compliance_uk@nium.com. This must be a recent statement (no more than 3 months old). It must include your account holder name, your IBAN/account number, and your bank’s logo.
If you do not provide Nium with this information, it may cause delays when you try to add or withdraw money from your funding account.
Adding money from a bank account
You can add money from your bank account to your funding account via bank transfer. You will find all the information necessary to perform this bank transfer correctly in the web app.
📘 NOTE:
When you open your Nium account, you will receive instructions on how to make a direct bank transfer to Nium. If you have not received this information, contact your Client Support Specialist.
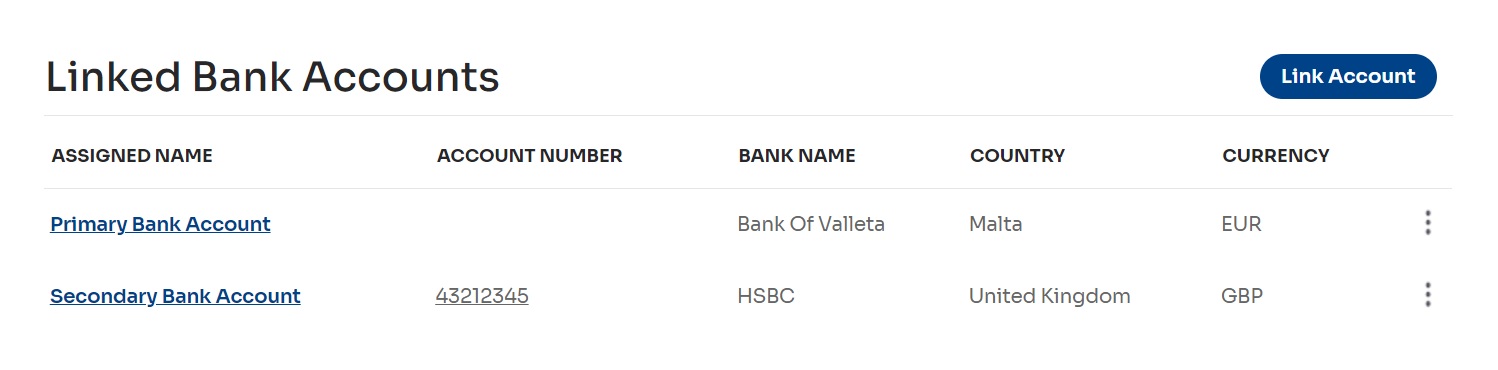
Viewing your Linked Bank Accounts
Select Funds > Linked Bank Accounts.
The Linked Bank Accounts page is displayed.
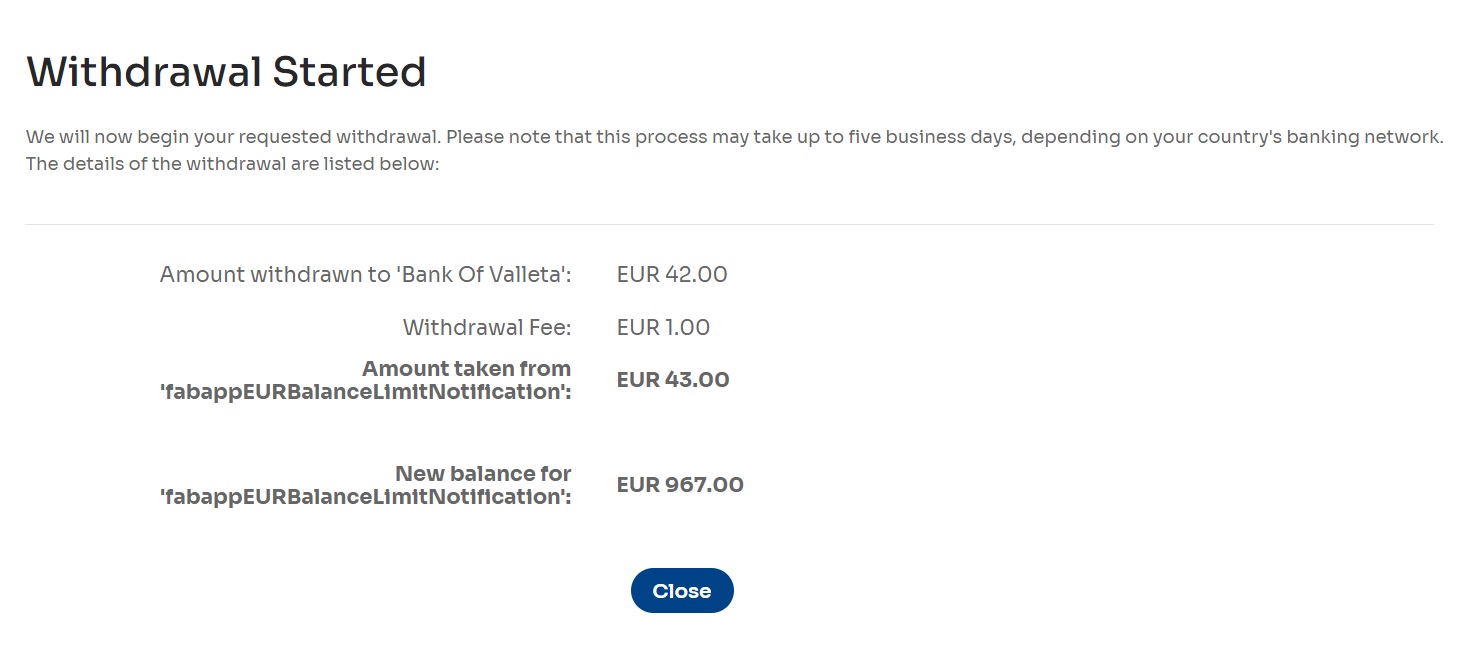
Withdrawing money to a bank account
Based on the model and region, you can withdraw money from a funding account to your linked bank account.
- Select Funds > Funding Accounts.
The Funding Accounts page is displayed.
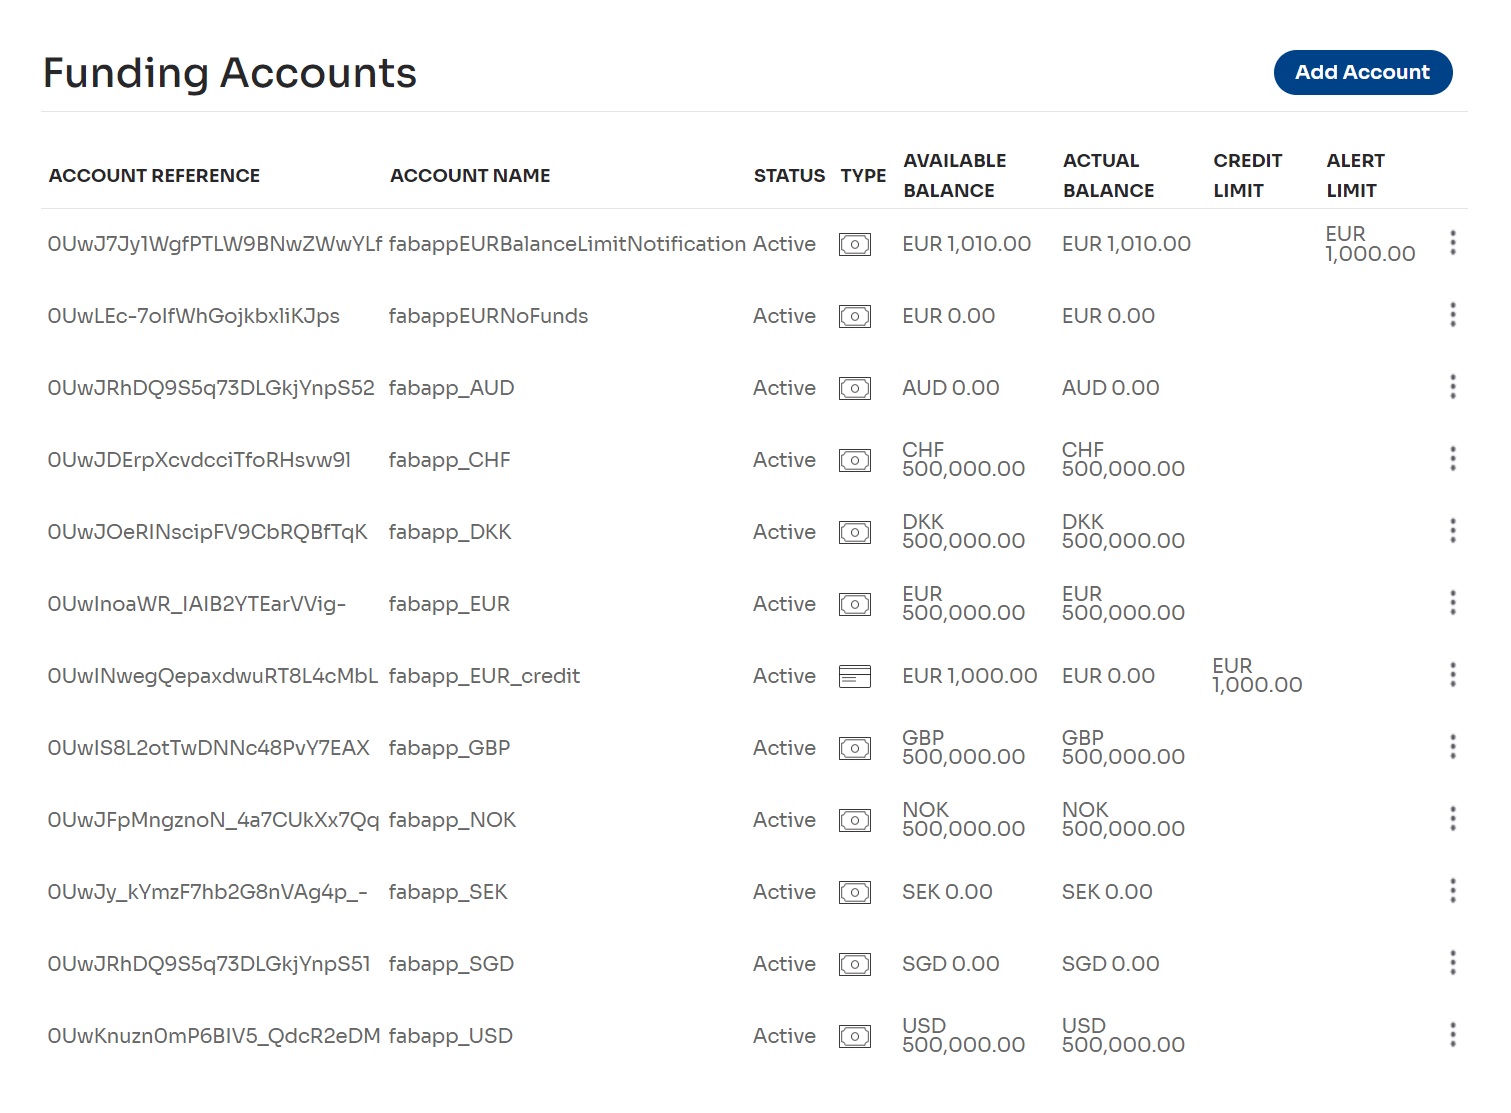
- Select the ⋮ icon in the row representing the funding account you want to withdraw money from.
The Action menu is displayed. - Select Withdraw to Bank Account.
The Withdraw Funds from Funding Account page is displayed. - In the Withdraw From field, select the funding account you want to withdraw money from.
In the Withdraw To field, select the configured bank account you want to withdraw money to.
📘 NOTE
The account that you chose in the first step of this procedure is selected by default.
- Enter the amount to withdraw in the Amount field.
📘 NOTE
The amount is expressed in the currency of the funding account.
A summary is displayed with information on the total payment.
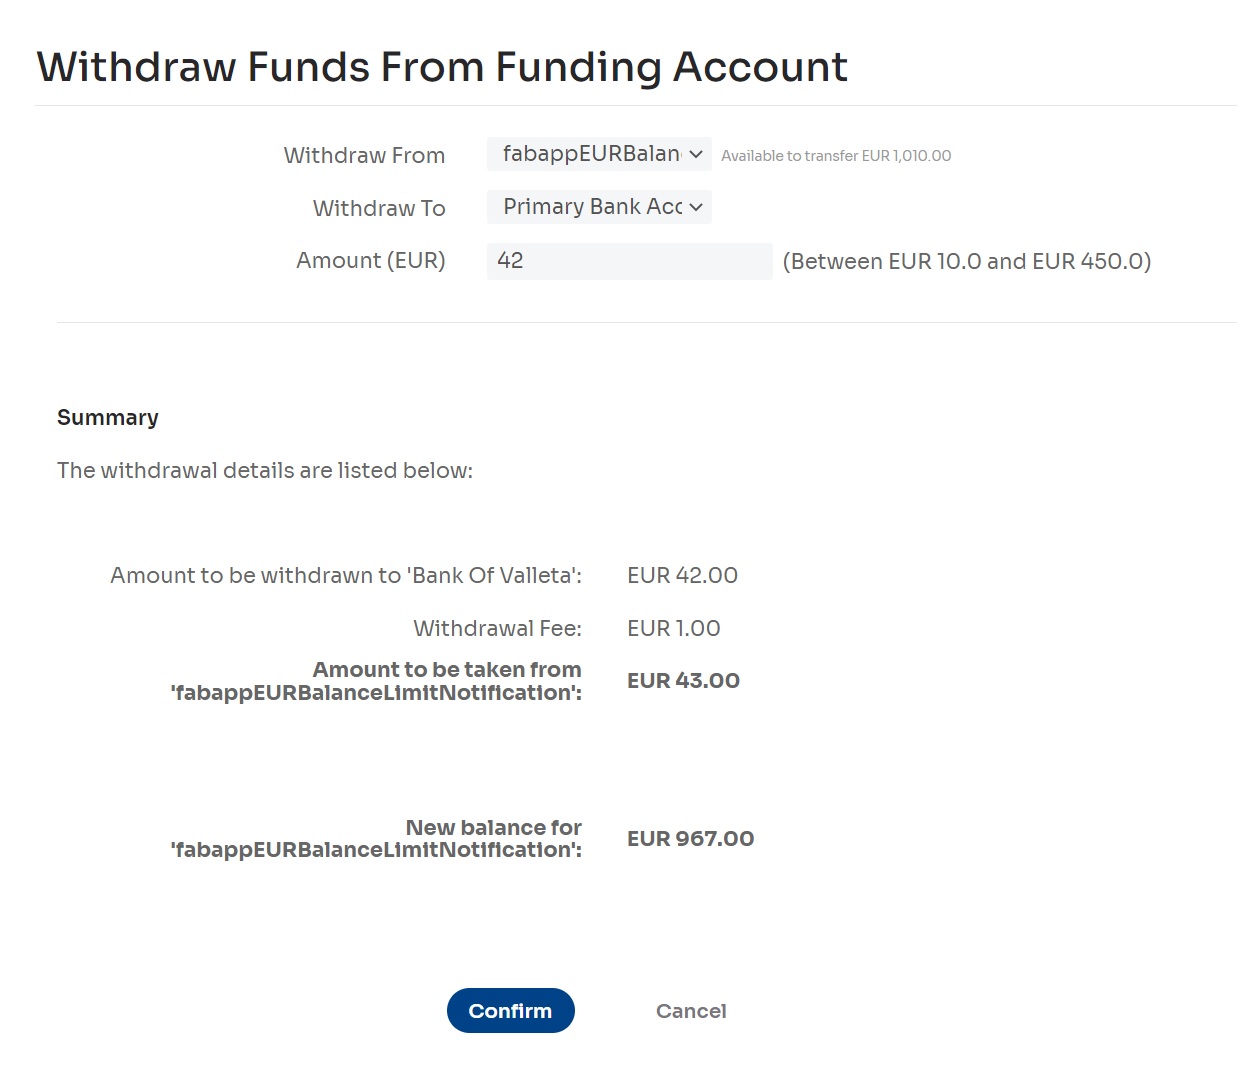
- Select the Confirm button to continue.
The Withdrawal Started page is displayed.