Creating and Managing Cards
Creating a card
You can create and load a single card on the Create Card page.
Before creating any cards, ensure your relevant funding accounts have enough funds to cover card loading.
- Select Cards > Create Card > Single
The Create Card page is displayed. - Complete the following fields:
- Select the Card Type: This determines card features (for example, the card brand).
- Select the Currency: This defines the currency for the card you’re creating.
- Enter the Amount: This defines the amount of money to be loaded onto a card after its created
📘 NOTE
The amount of money that you can load onto a card during card creation depends on the limits set for your user group by your administrator). Please contact your administrator if you encounter loading limitations.
📘 NOTE
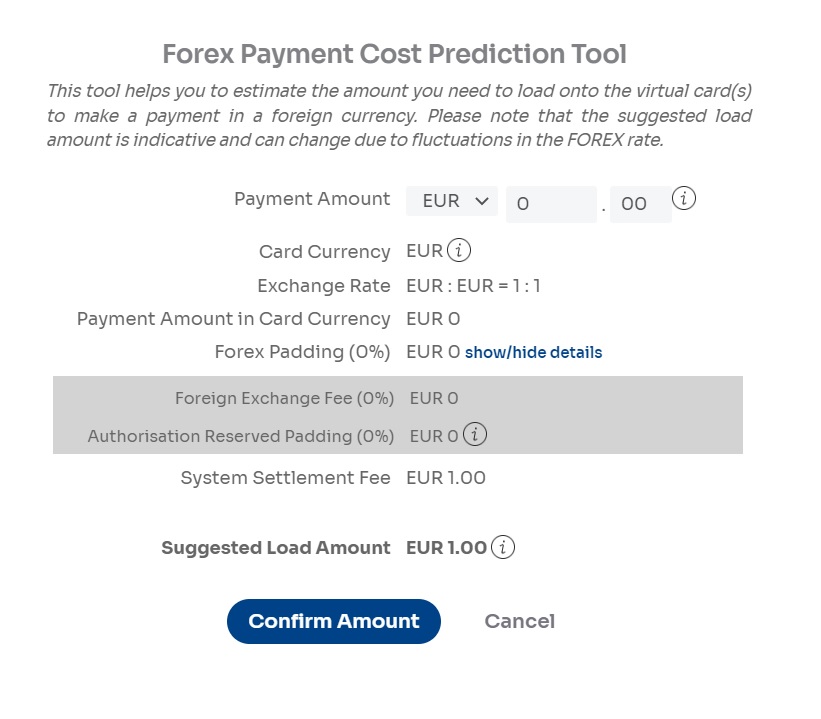
You can select the Forex calculator link to estimate the required load amounts based on current Forex conversion rates.
iv. Select the Funding Account: This identifies the funding account from the initial load amount (if any), and any applicable fees will be taken from.
📘 NOTE
Credit is a custom feature. Please contact your Client Delivery Specialist if you want to apply for credit.
v. Clearance Date: This will automatically delete the card on the specified date and any remaining funds would be transferred back to your funding account. The card will remain valid until 23:59:59 GMT on the given day. This will reduce the risk of fraud.
- Optionally, you can schedule to load a card in the future by selecting the Scheduled Loads [+] link. With the scheduled load feature, you can delay the loading of funds onto a card until a date of your choice. This is useful when you need a card but want to pay later. For example, when you book a hotel room for your client but pay for the room when the client arrives. Using scheduled loads can help you unlock valuable working capital. Since funds are not available on the card until the date and time you chose, scheduled loads reduce your fraud exposure. Scheduked loads available ar executed daily at 7a.m. GMT time.
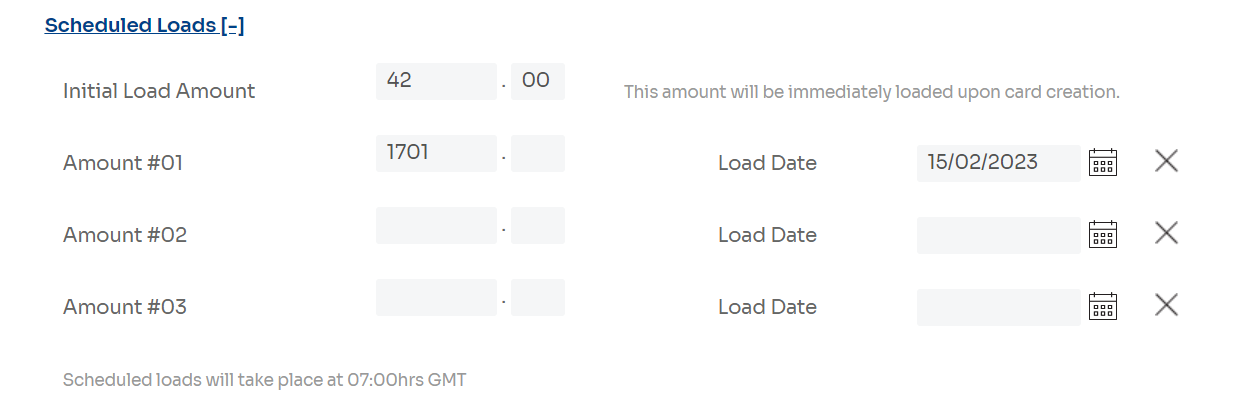
a. Enter the Initial Load Amount: This is the amount loaded when the card is created. (This is the same as the value in the Amount field above).
b. Enter a Scheduled Load Amount and select the calendar icon to choose the Load Date.
You can schedule a maximum of three loads on a single card. You can delete loads by selecting the [x] icon or leaving them blank.
If, during card creation, you choose a Single Load Card Type, you can only load your card once, either at the same time you create the card or in a single scheduled load. An error will be reported if you try to load it more than once. This feature is typically used by customers who want to maintain tight control over card usage.
- Optionally, you can add details for the requested card by selecting the Additional Details [+] link. You can use the External ID to identify the card uniquely. You can also use Additional Details to add custom data to the card - for example, a booking reference number or department name. You can enter a maximum of 20 custom detail entries. By default, five entries are displayed.
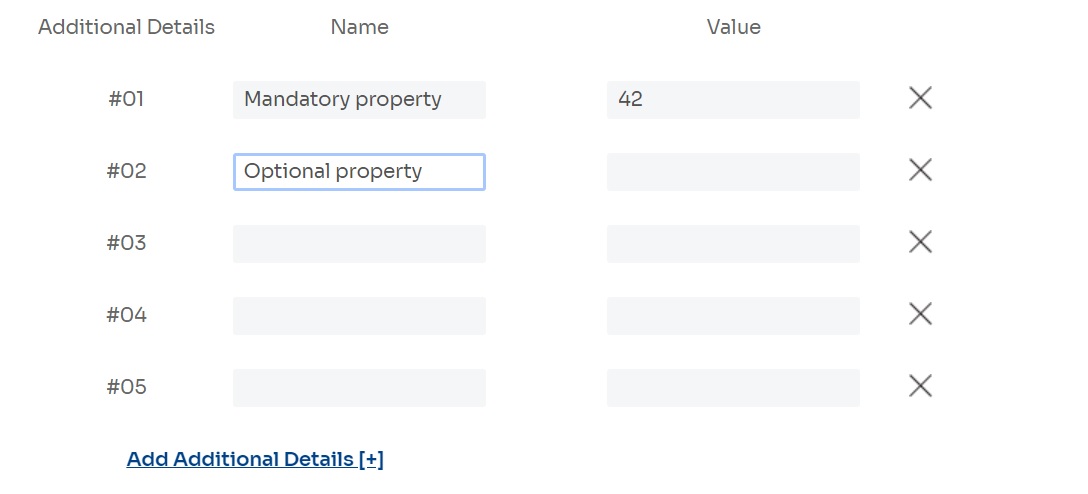
a. Select the Add Additional Details [+] link if you need more entries.
b. If you do not need entries, you can delete them or ignore them and leave them blank. To delete, select the [x] icon to the right of the row of fields.
📘 NOTE
Your deployment may have additional detail entries configured by default. You cannot change the name of a mandatory field or delete a mandatory field, but one needs to ensure that a value is always provided.
- Select the Create button to create the card.
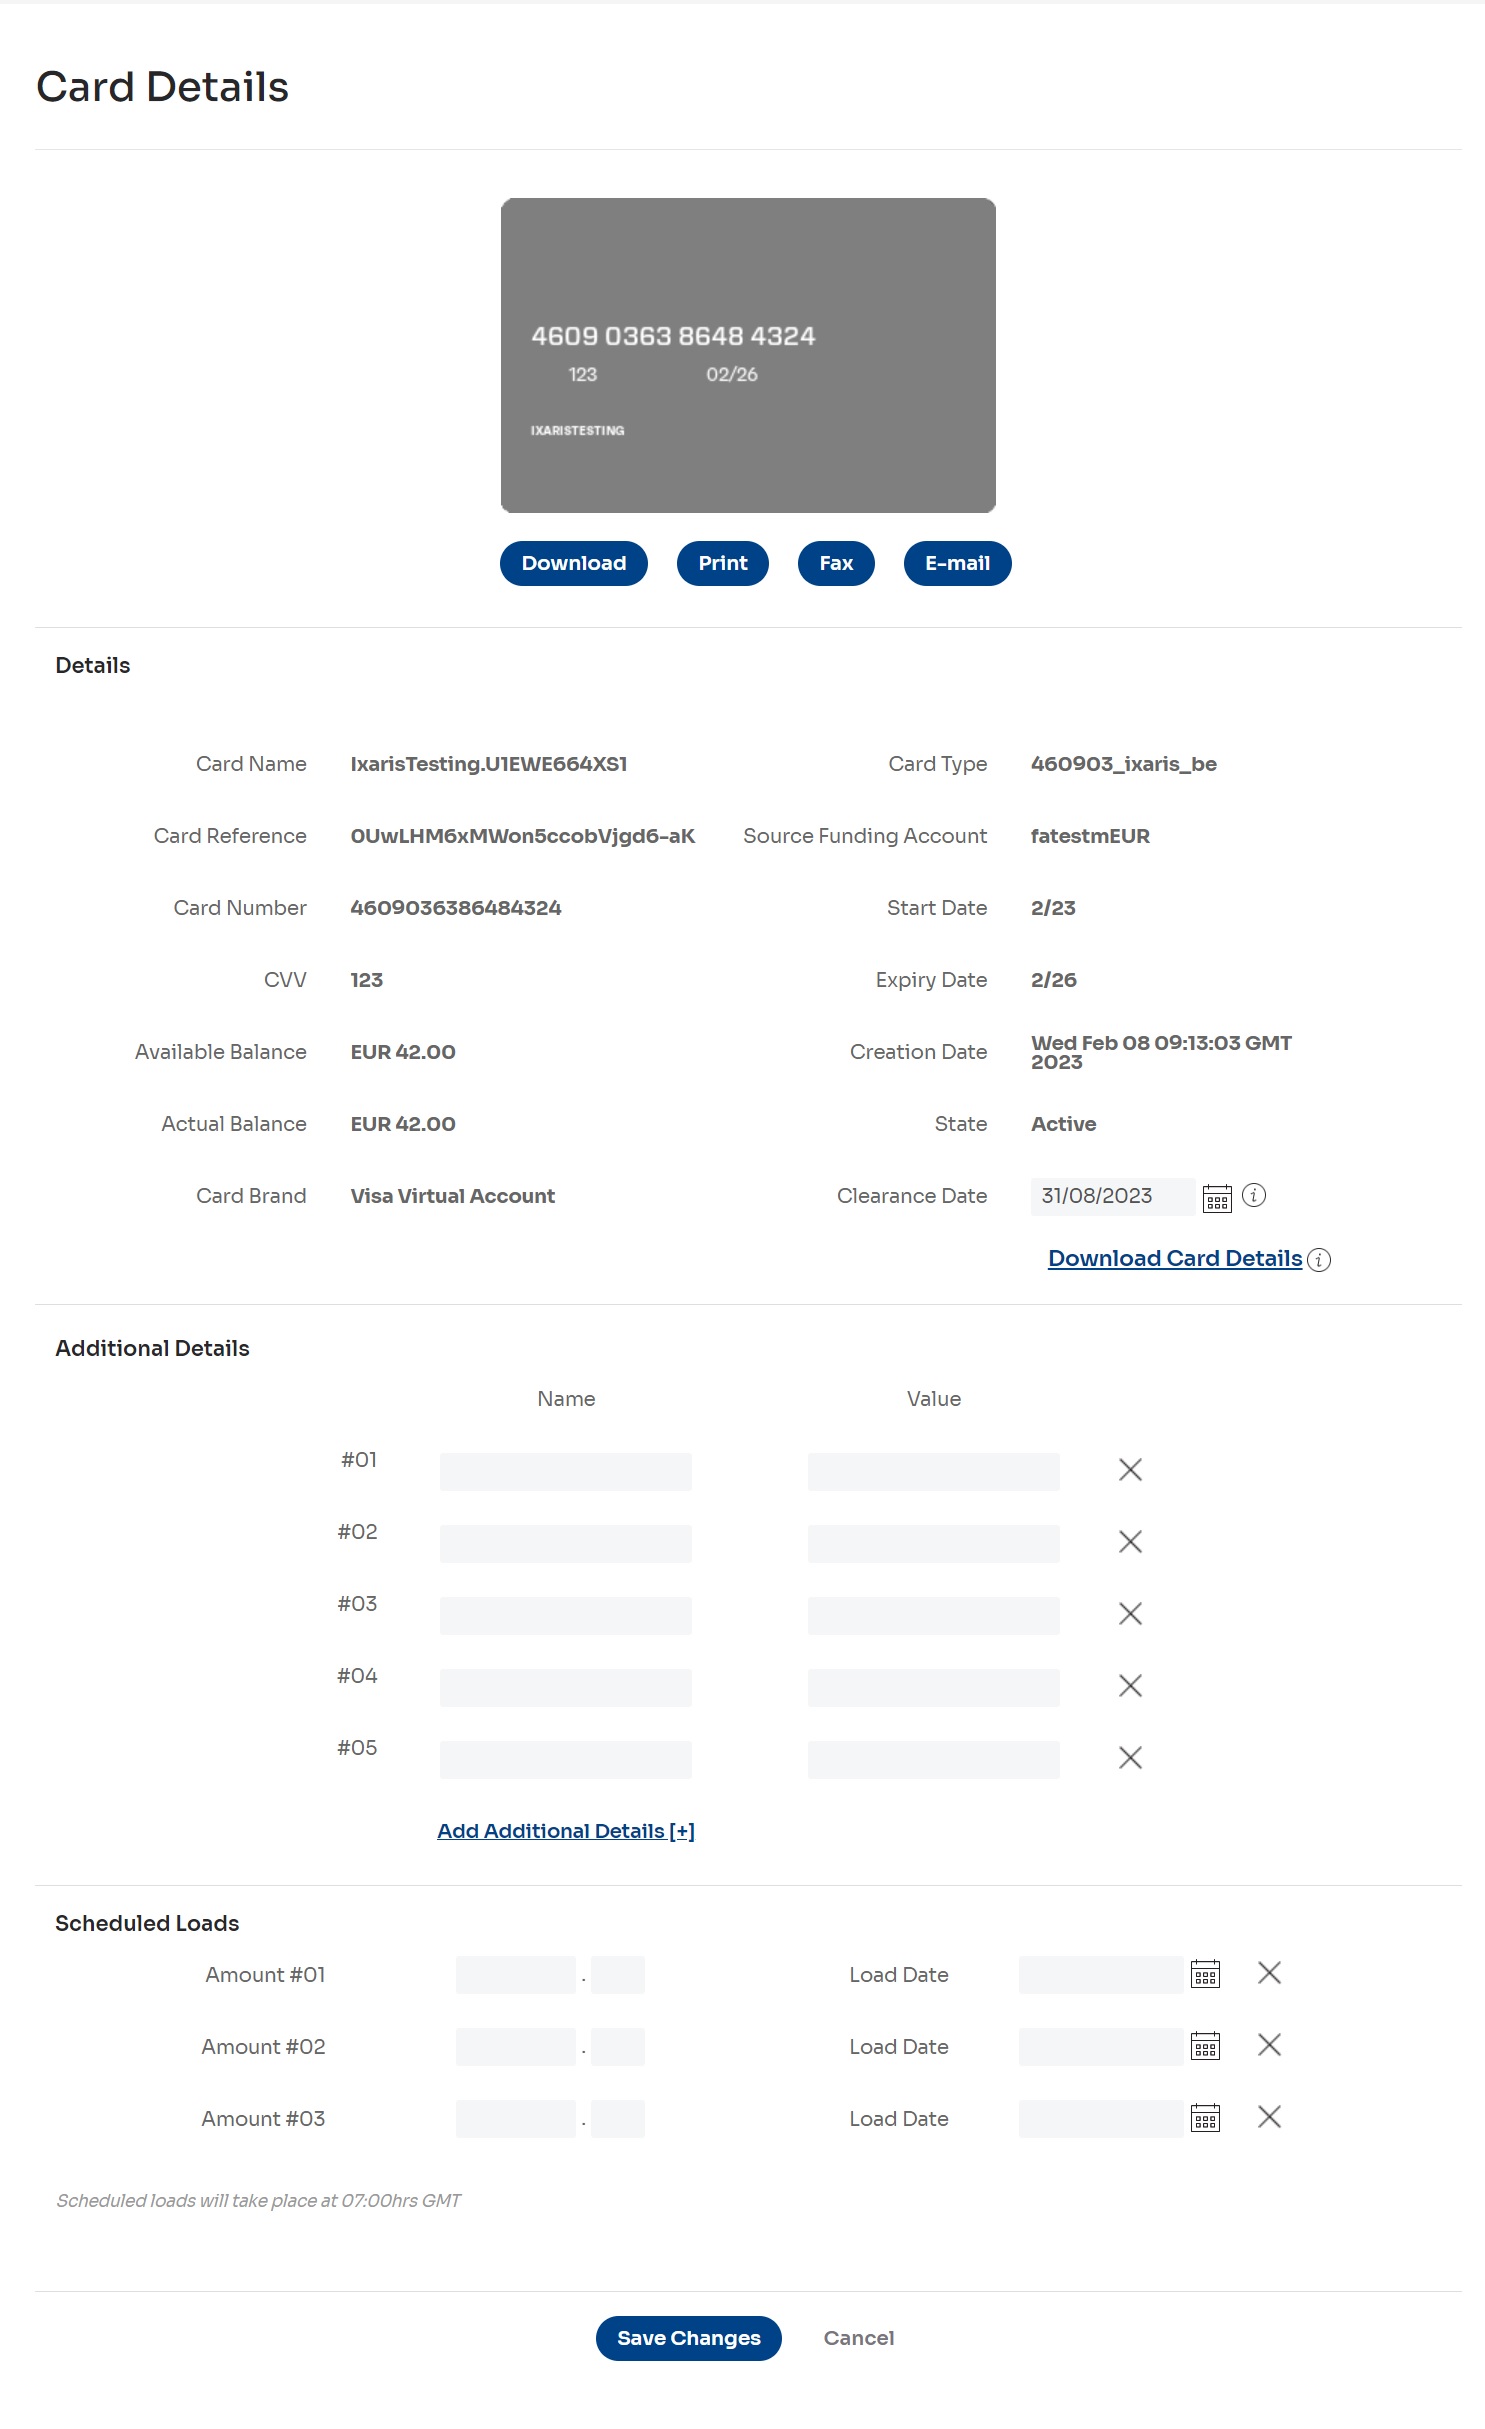
The card is created, and the Card Details page is displayed.

- Select the Download button below the card image to save card images.
- Select the Print button below the card image to print card images.
- Select the E-mail button to share card images and details via email.
- Specify details on the Email Card Image page. You can add a custom message or list (if templates are available in your installation) and select a predefined template from the drop-down.
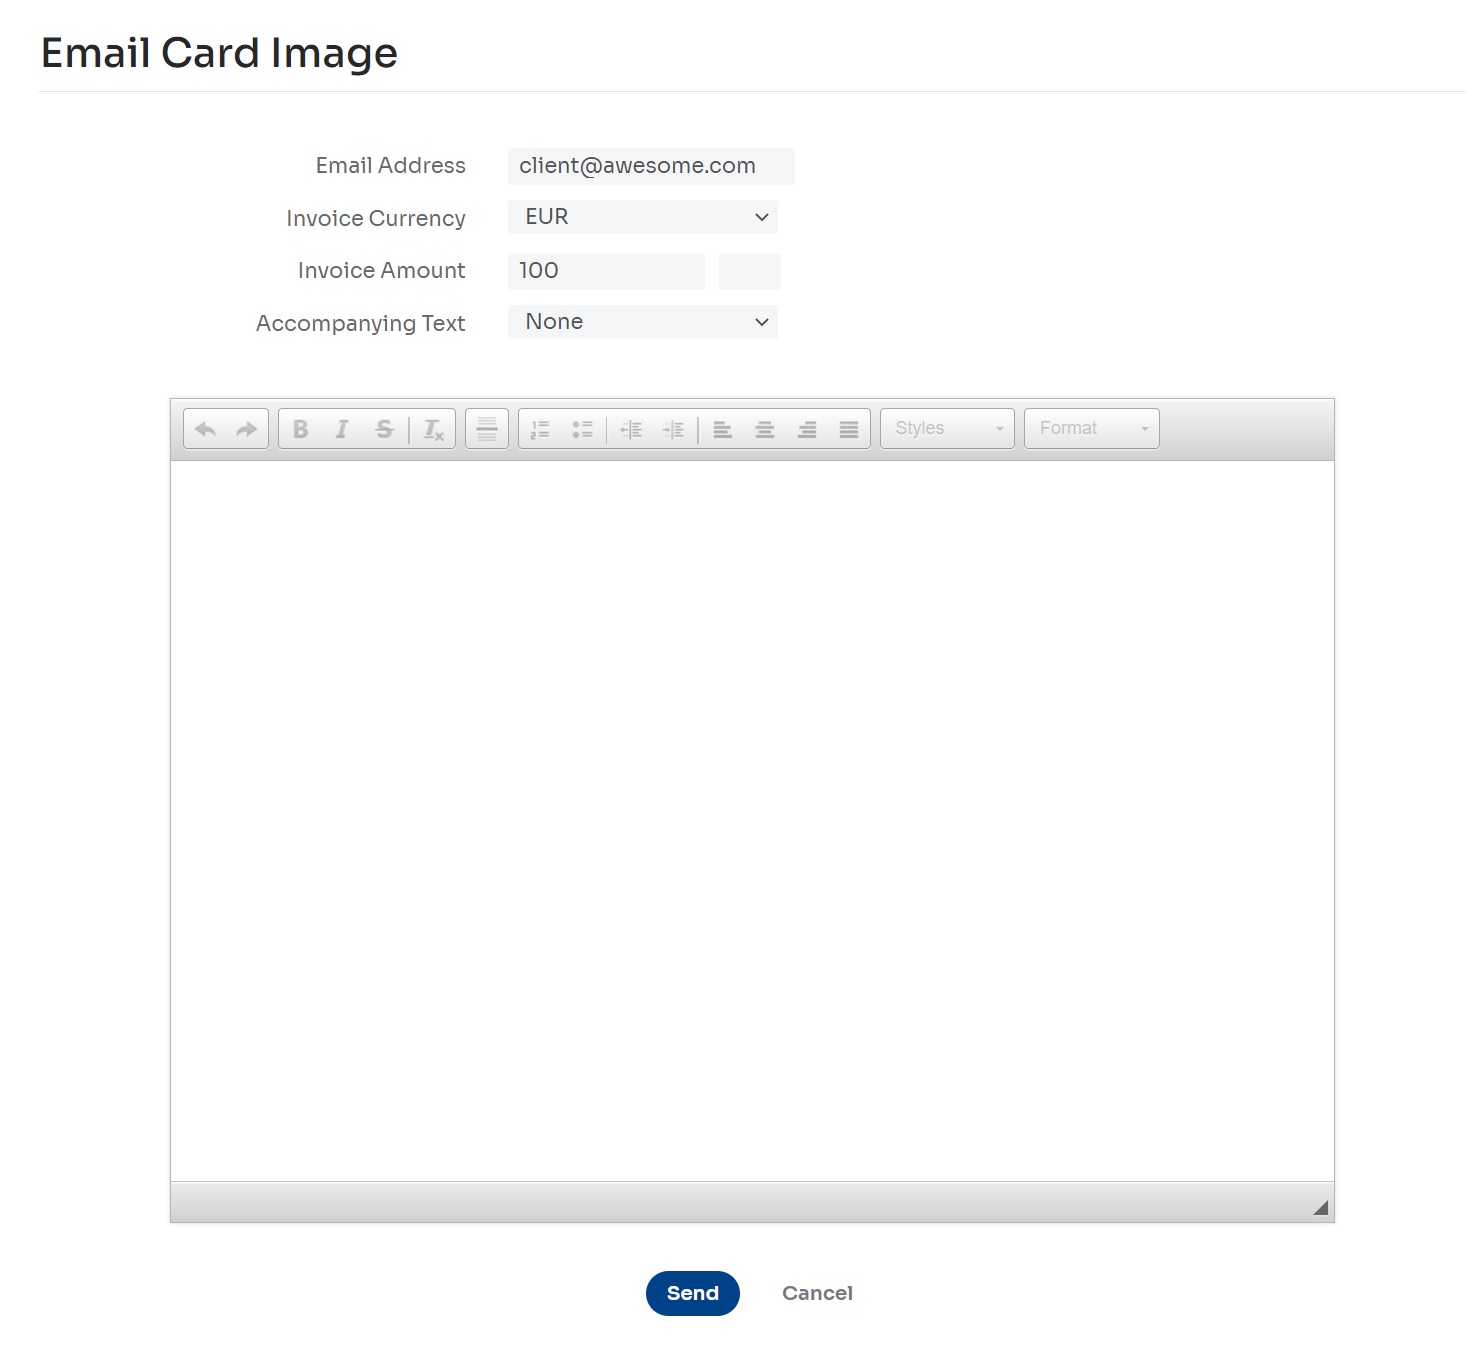
ii. Select the Send button on the Email Card Image page to send the email. The recipient can receive a link and view card images and details.
iii. To view your emails' status, see the Details page's Link History section.
This section contains a log entry for every link sent by email or API for this card. The link expires automatically when the card is deleted, when the link has been opened three times, when a new link is sent by email or requested API for this card (only one link can be active at a time for one card). The recipient views the card image or details until a link is expired. Select the [X] icon in the Actions column to manually set a link to expire.
- To export card information to a file, select the Export Card Request Data link in the bottom right section of the page. (You can select the Close button in the confirmation window to close it. The export process will not be aborted.)
When the file generation process is complete, the Export Card Request Data link will be replaced by a Download File link. Select to download. - To change additional details or scheduled loads for a card, enter new information in the Additional Details section and the Scheduled Loads section and select the Save Changes button.
Creating a batch of cards via File
Using the predefined file, you can create a batch of new cards and load them from the Create Cards page.
Before you do, ensure your relevant funding accounts have enough money to cover the card load amount. For more information, see - Creating a funding account - Prepaid accounts.
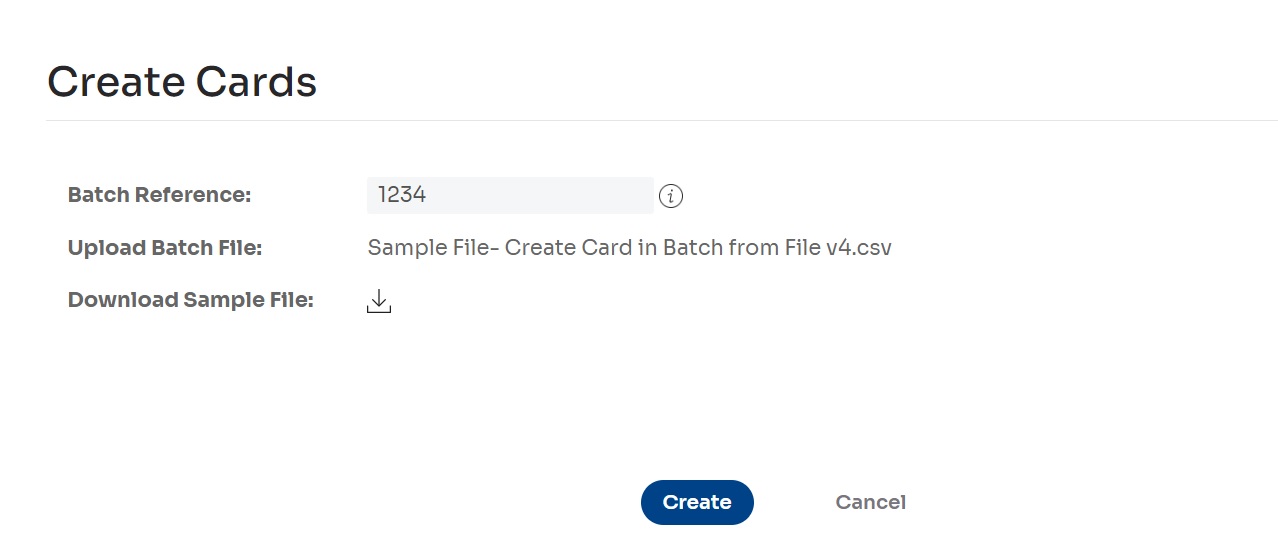
- Select Cards > Create Card > Batch
The Create Cards page is displayed. - Enter a unique Batch Reference: The batch reference uniquely identifies a batch and can be used later to track the status of this request.
- Download the Sample file from this page.
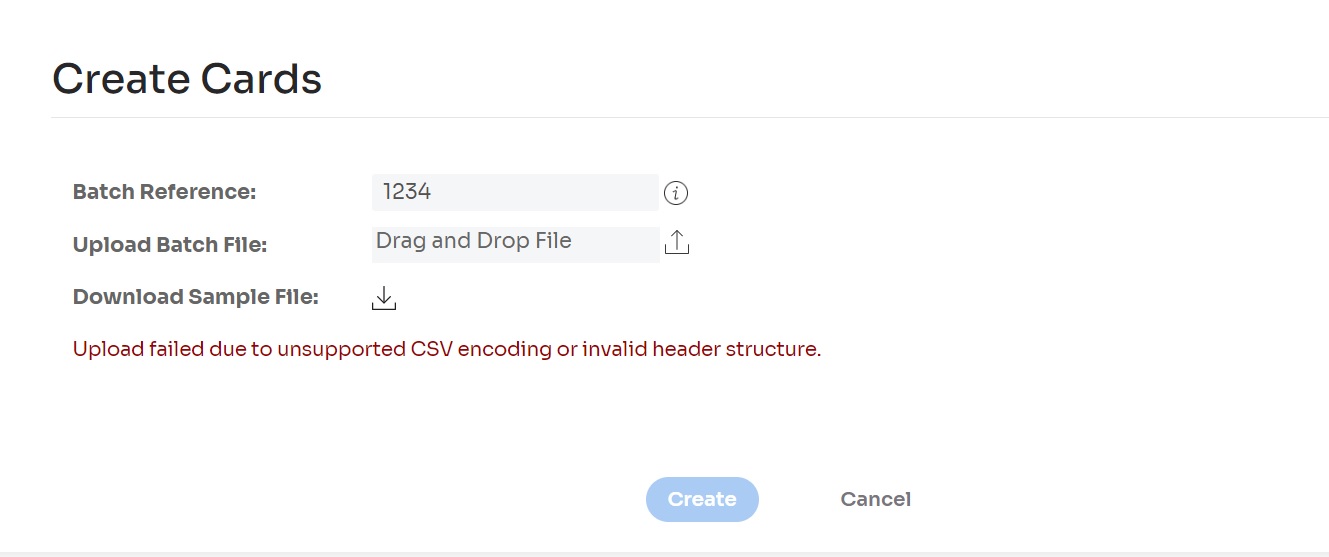
- Upload the file using the predefined structure from the Sample file. Fill in all the mandatory fields and use the optional ones for the Virtual Card details. The system accepts excel files in CSV UTF-8, UTF-8 BOM, UTF-16, UTF-16 BOM. Note: Custom Filed Name field accepts only Latin letters
📘 NOTE
The amount of money that you can load onto a card during card creation depends on the limits set for your user group by your administrator. Please contact your administrator if you encounter loading limitations.
📘 NOTE
Remove the instructions and example from the Sample file and keep only the Header of the file presented in the row 1.
- Select the Create button to start the card creation process.
- The system will make preliminary validations at this action and will either proceed with processing the file or return the error log. The details of the errors detected from the file processed will be available in the file downloaded from the Download error log.
- Correct the file containing input parameters for the cards created in bulk and re-submit the same file again.
- Once the file passes the validations, the create cards in bulk process starts.
- A progress bar will show the creation status.
The Request Completed message indicates that all cards of a specific type have been created successfully and card details are ready to be reviewed.
The Request Completed with Failures message indicates that some cards could not be created. There are various reasons this can occur. For example, you do not have enough money in your funding account to load the cards. A value in the Unfulfilled Cards column shows how cards were not generated. - To view card information for a selected batch in the request, choose the Download Card Details link in the bottom right section of the page.
The Batch Card Create Details file displays the details of all created cards.
📘 NOTE
The input file for Create cards in Batch via File should be in CSV file format, following the header structure from the sample file. Supported encodings for the CSV file are: UTF-8, UTF-8 BOM, UTF-16. UTF-16 BOM.
Loading a card
When you load your card(s), you can load cards at the same time you create them or later. If you have multi-load cards enabled, you can also load cards repeatedly whenever suits your needs.
Before loading a card, ensure your funding accounts have enough money to cover your load amounts. For more information, see Creating a funding account - Prepaid
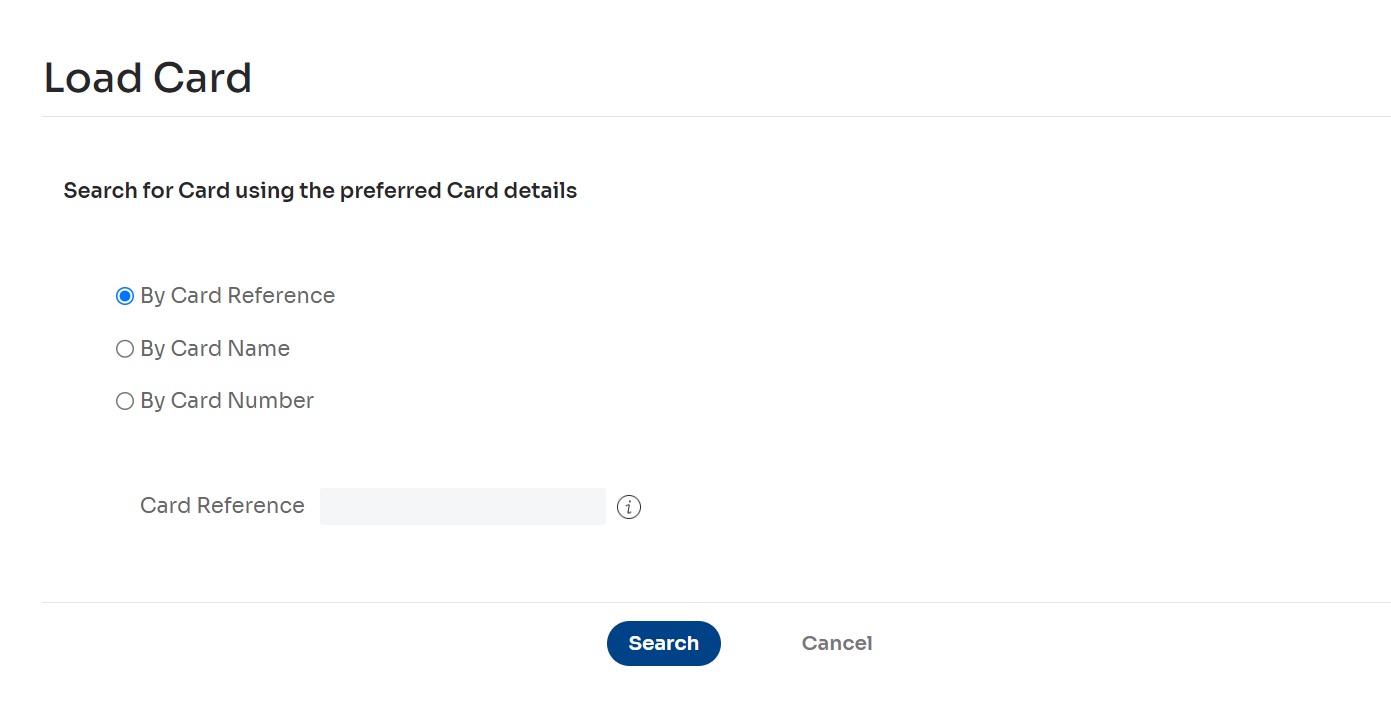
- Go to the Load Card page:
- Select Cards > Load Card > Single, select the search method by selecting the appropriate radio button (By Card Reference, By Card Name, or By Card Number), enter the search criteria in the input field and select the Search button.
- Select Cards > Manage Cards, select the ⋮ icon in the row that represents an active card, and choose Load Card.
Card details (including card images) are displayed on the Load Card page.
- Enter the load details:
- Select a value in the Load From field: This field represents the funding account you will load the card from. (The funding account must be used to be visible in the drop-down list.)
- Enter the Amount: This field represents the amount of money you can add to a card. (The amount must be within the allowed limits of your account.)
📘 NOTE
The currency is displayed next to the Amount field. If this currency is different than the source currency or the destination currency, Forex fees may apply. Select the Forex calculator link to estimate your load amounts based on current Forex conversion rates.
Fund Transfers and supported currencies depend on the region and based on the commercial agreement
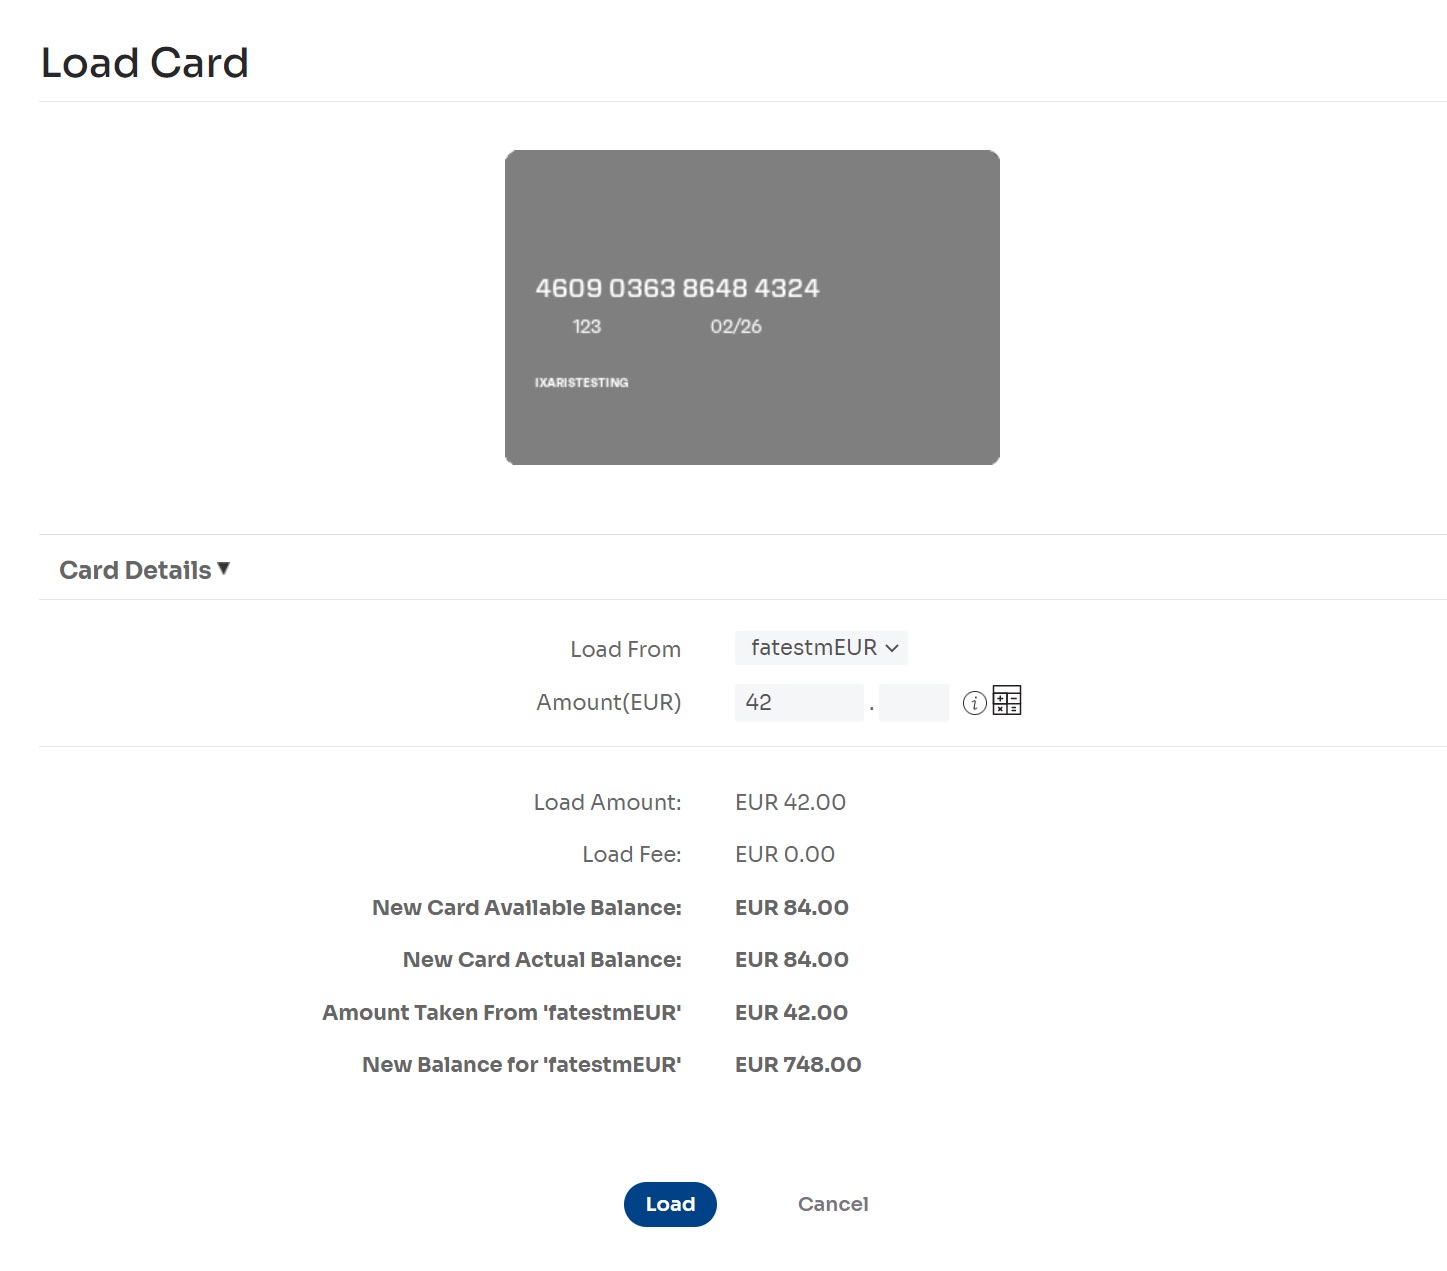
- Select the Load button to initiate the card funding process.
The card is loaded, and the details are displayed on the Load Complete page.
📘 NOTE
When you load a card for the first-time using credit funds, that card is linked to that particular credit funding account. You cannot load this card from a different credit funding account in the future.
Loading a batch of cards
As with cards created individually, you can load a batch of cards when you create them or later. If you have multi-load cards enabled, you can also load a batch of cards repeatedly whenever it suits your needs.
Before loading a batch of cards, ensure your funding accounts have enough money to cover your load amounts. For more information, see Creating a funding account - Prepaid
- Select Cards > Load Card > Batch
The Load Cards page is displayed. - Search for cards that are to be loaded with funds. You can use the following search criteria:
- Enter the Creation Date range (From/To): These fields represented the dates when cards were created.
- Select the Card Currency: This field represents the currency of the cards you want to load.
- Select the Card Type: This field represents the name of the card type used to create the cards.
- Enter the Available Balance range (From/To): The cards you want to load should have their available balance in the given field (values are represented in the selected Card Currency).
- Select the _Card Brand:_This field represents the card brand you want to load.
If you cannot find the cards you need to load using basic search, choose the Advanced Search link for additional search options. If you need more entries to search for, select the Add Additional Details [+] link. You can delete optional entries you don't need by choosing the [x] icon to the right of the row of fields or leaving the entries blank. The order of the fields does not influence the search.
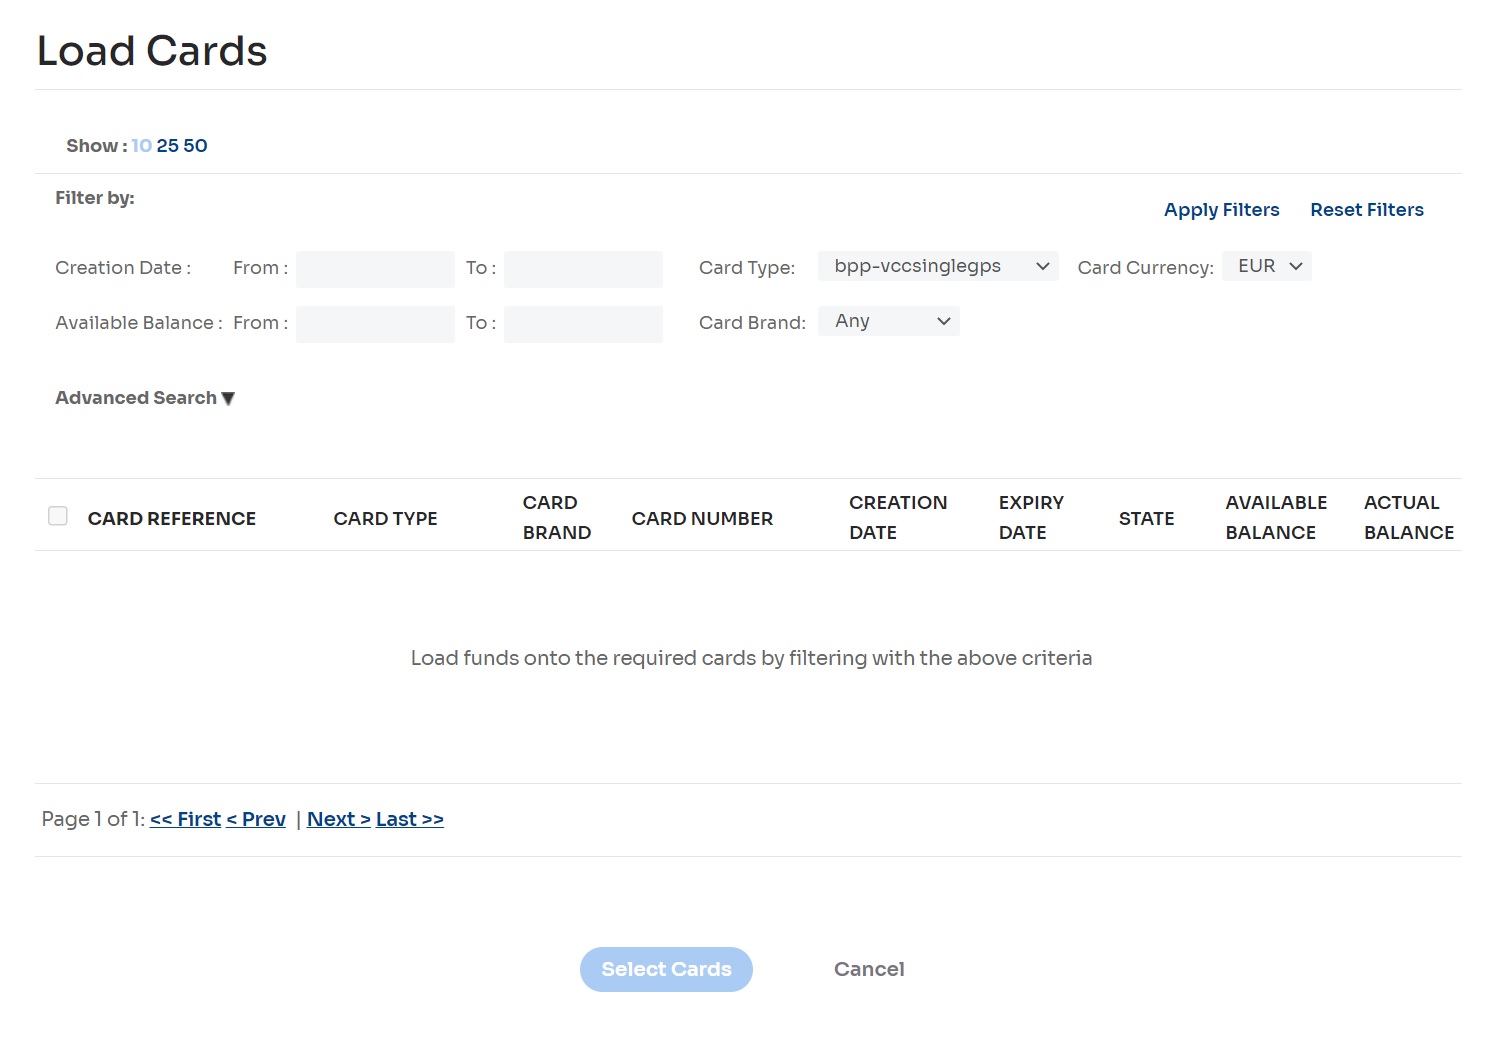
- Select the Apply Filters button to apply the criteria you selected.
A list of cards that match these criteria is displayed. - Choose cards to load by selecting checkboxes to the left of each entry, then choose the Select Cards button.
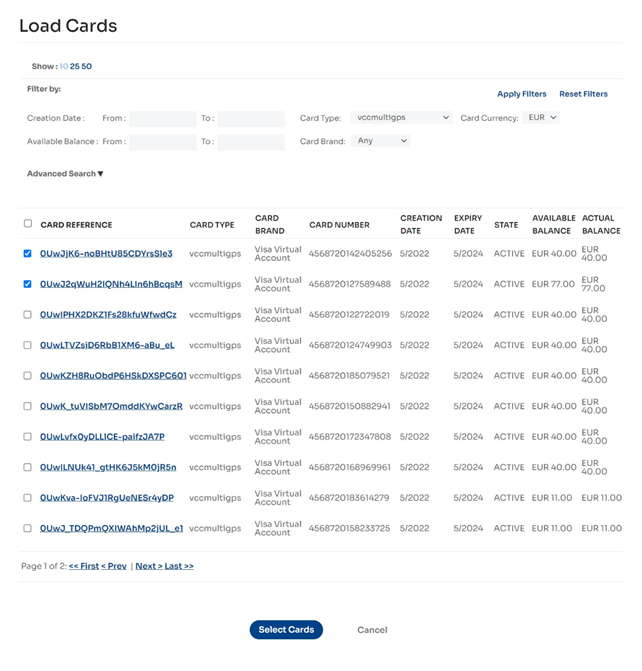
A list of selected cards and the Load Details section are displayed.
- Enter the load details:
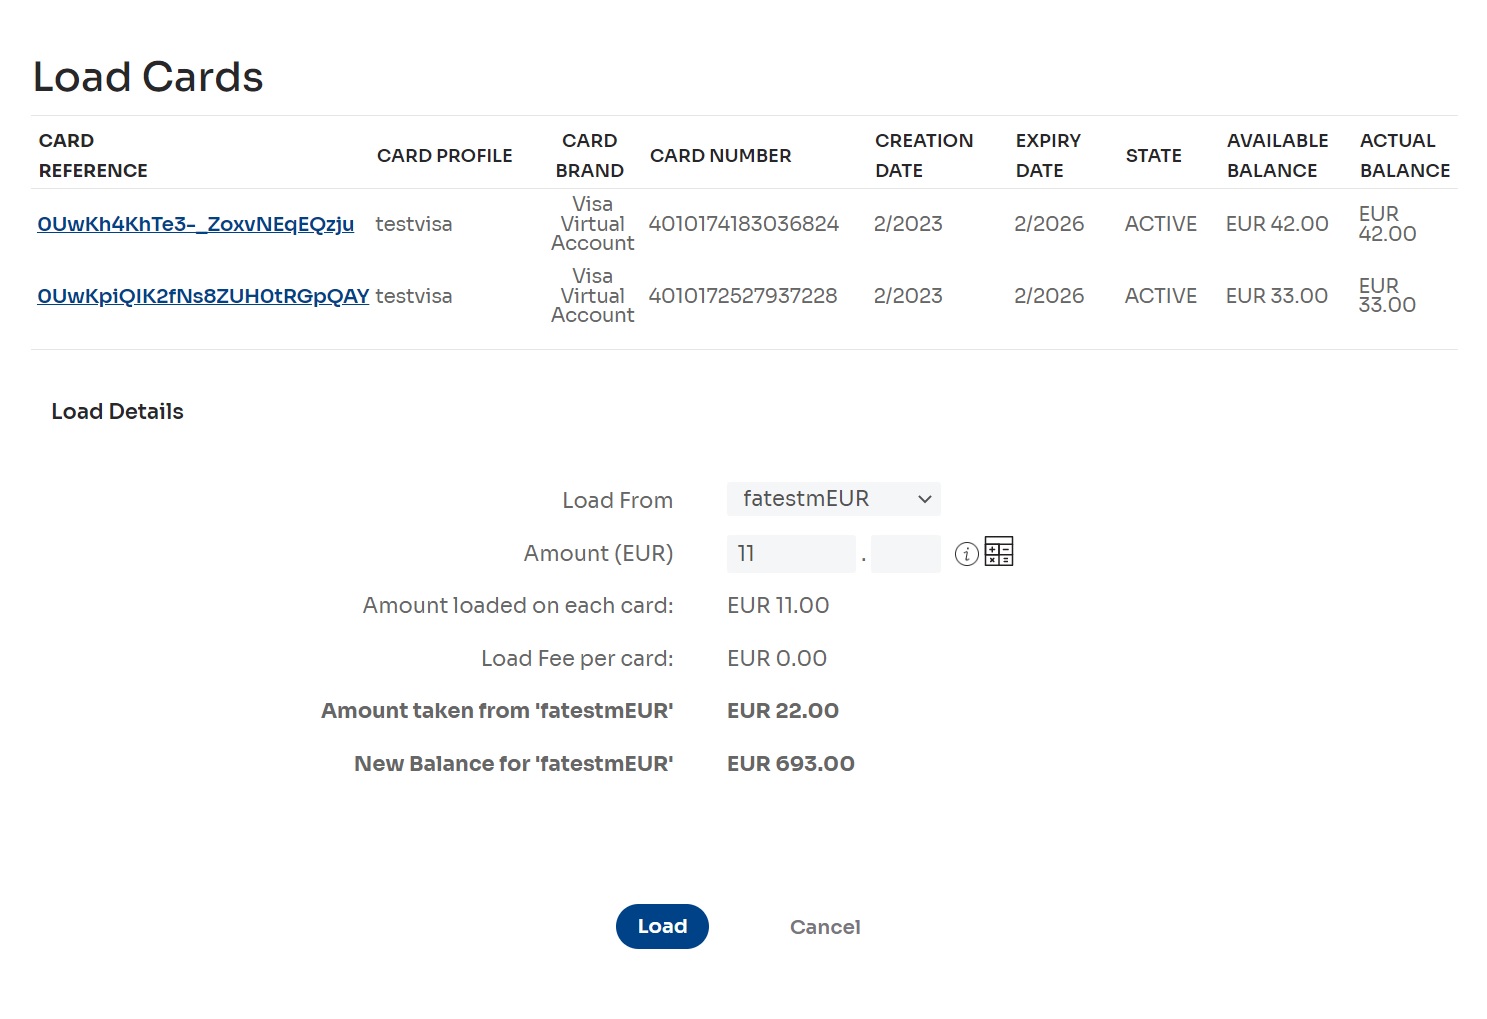
i. Select a value in the Load From field: This field represents the funding account that the card will be loaded from. (The funding account must be used to be visible in the drop-down list).
📘 NOTE
When you load cards for the first-time using credit funds, those cards are linked to that particular credit funding account. You cannot load these cards using credit funds from different credit funding accounts in the future.
- Enter the Amount: This field represents the amount you want to load on each card.
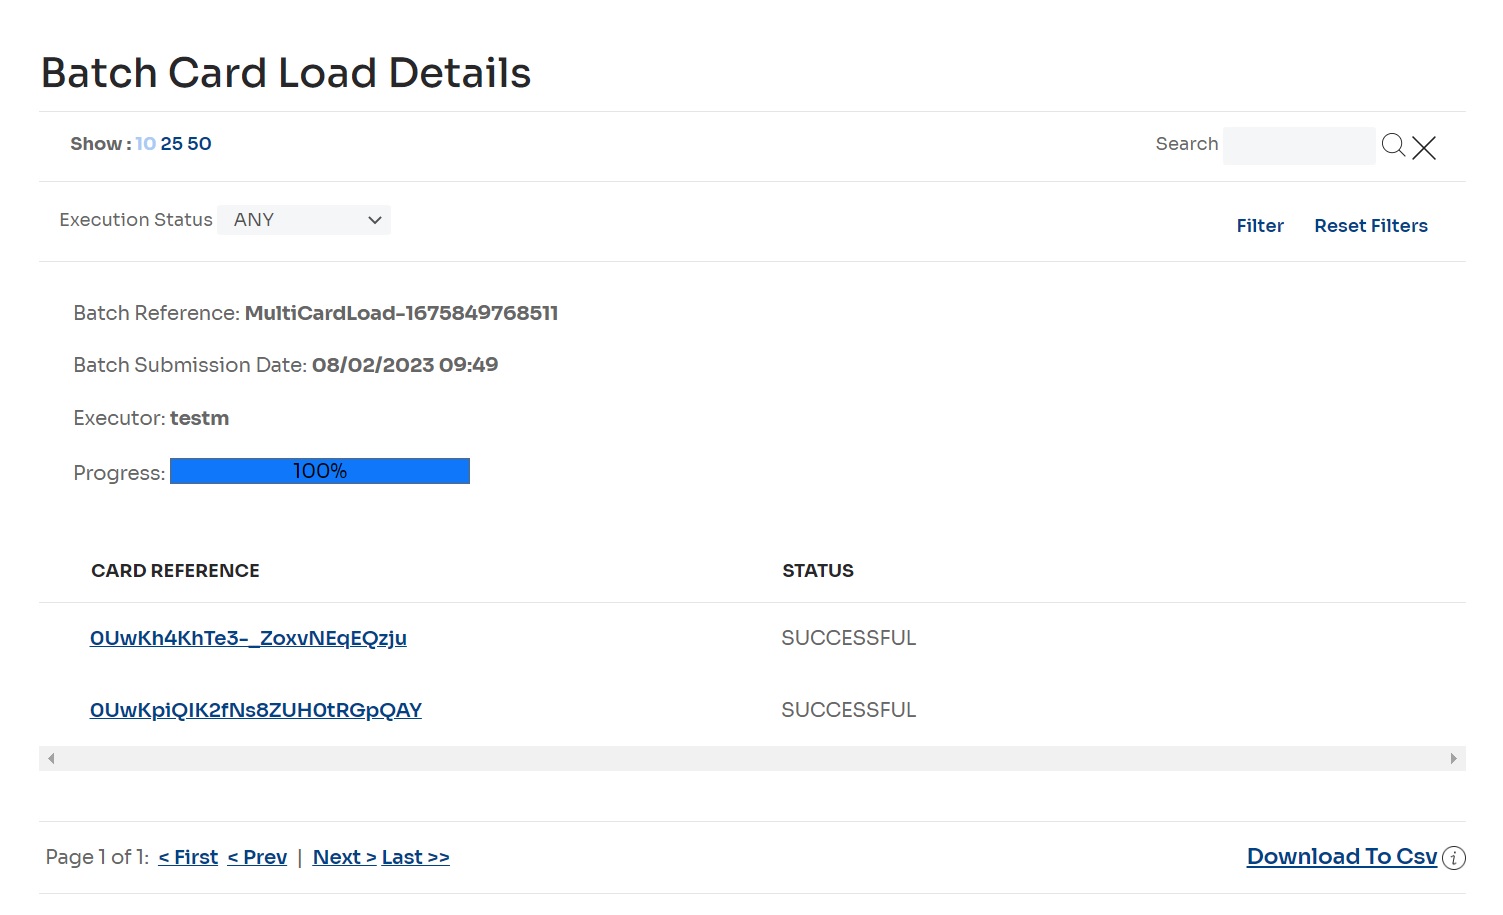
The Batch Card Load Details page is displayed and shows the progress of the batch load.
👍 IMPORTANT:
The Amount is the amount to be loaded onto each card, not the total amount to be loaded onto all cards (and split between them).
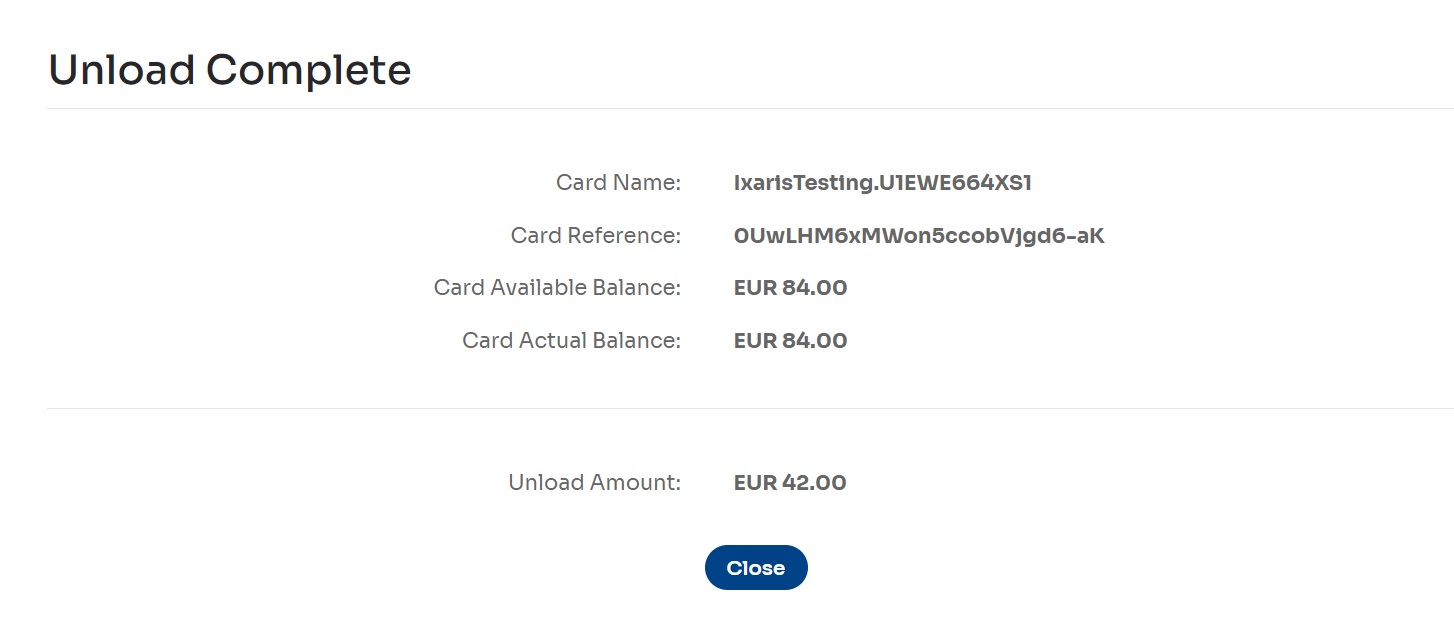
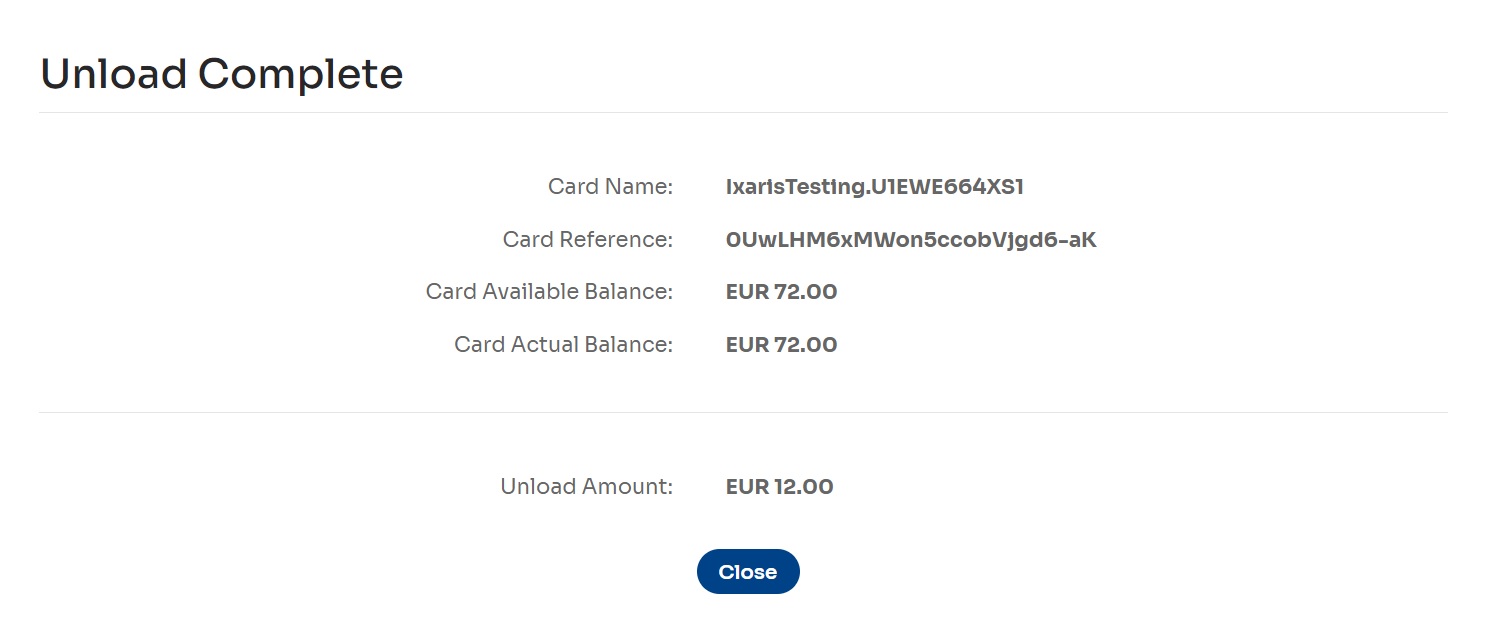
Unloading funds from a card
You can return money to a funding account from a card by unloading the card. Unloading, in other words, ‘empties’ the card of funds.
- Select Cards > Manage Cards, select the ⋮ icon in the row representing an active card, and select Unload Card. Card details (including card images) are displayed on the Unload Card page. Select Card Details to see more.
- Enter details to unload the card:
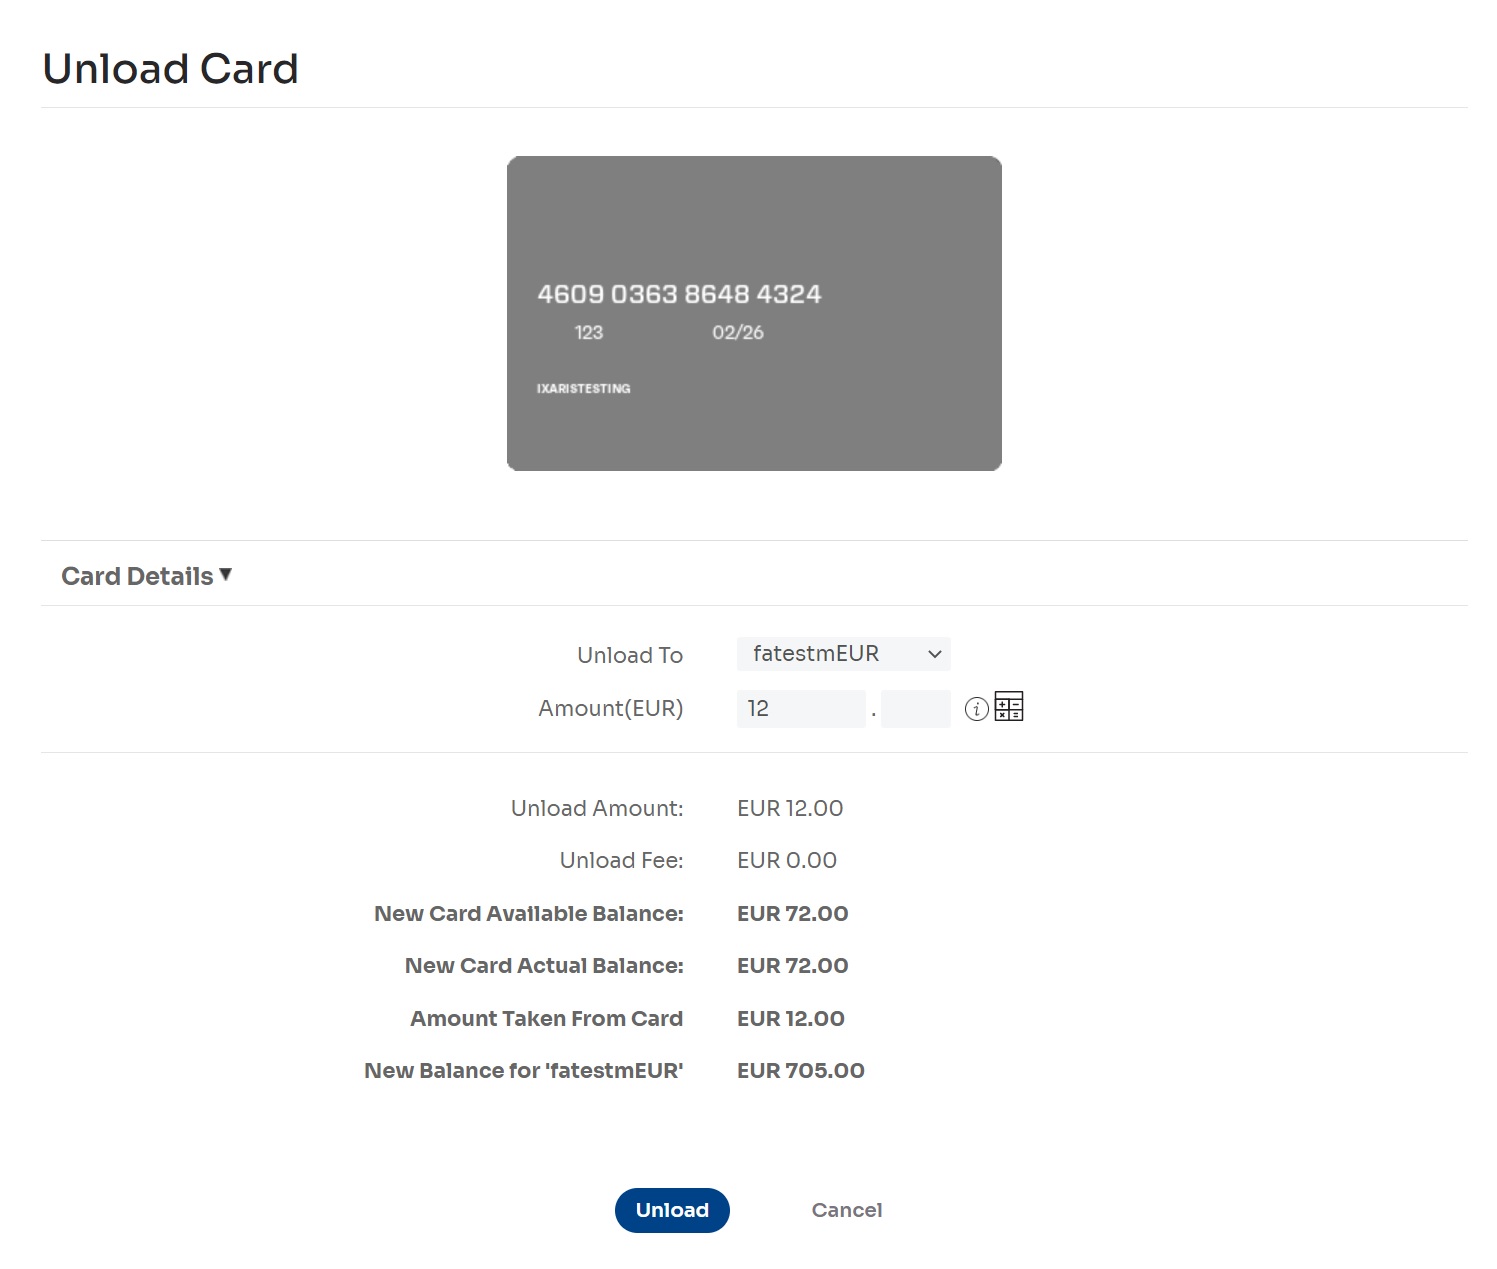
i. Select a value in the Unload To field: This field represents the funding account you want to transfer the card’s funds to. (The funding account must be used to be visible in the drop-down list).
📘 NOTE
If you are unloading a card to a credit funding account, it can only be unloaded to the same credit funding account that you originally loaded it from.
ii. Enter the Amount: This field represents the amount you want to unload from the card. (The amount must be within allowed account limits).
📘 NOTE
The unload currency is displayed next to the Amount field and is always the same as the card’s currency. If this currency is different than the destination currency, Forex fees may apply. Select the Forex calculator link to estimate your unload amounts based on current Forex conversion rates.
- Select the Unload button to initiate the operation.
Unloading is completed, and unload details are displayed.
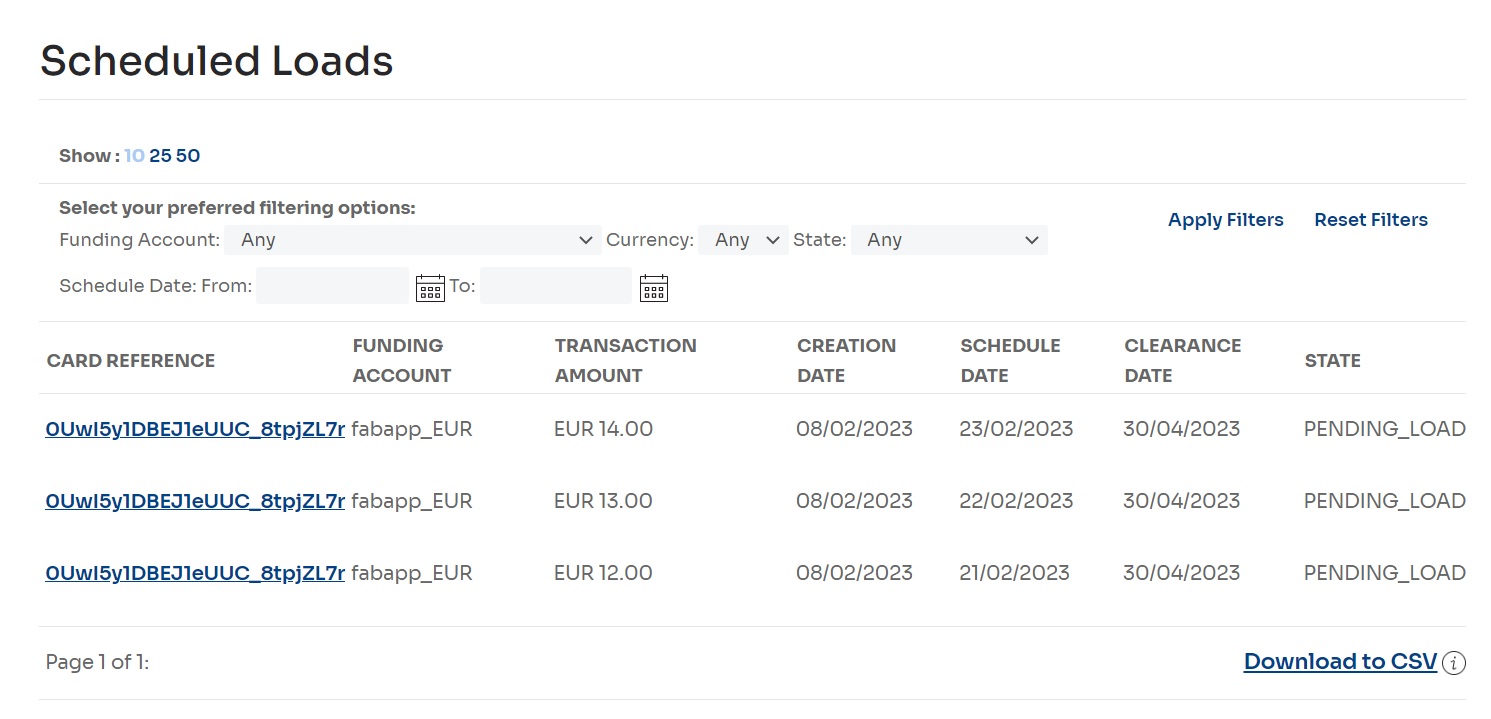
Scheduled card loads
You can view the loads scheduled for the future on the Scheduled Loads page.
- Select Cards > Scheduled Loads.
The Scheduled Loads page is displayed.
-
If you need to modify the scheduled load list view:
- Select a value next to Show heading to modify the number of scheduled loads listed on a single page (10, 25, or 50).
- Enter or select values in the filter criteria fields (Funding Account, Currency, State, Schedule Date) and select the Apply Filters button to filter visible results.
-
To export the list of scheduled loads to a file, select the Export to CSV link in the bottom right section of the page. (You can choose the Close button in the confirmation window to close it. The export process will not be aborted).
When the file generation process is complete, the Export to CSV link will be replaced by a Download File link. Select to Download. -
Select a value in the Card Reference column to view individual card details. From the Card Details page, you also delete and schedule loads
Viewing and managing cards
You can view card details and perform card operations on the Manage Cards page.
- Select Cards > Manage Cards.
The Manage Cards page is displayed.
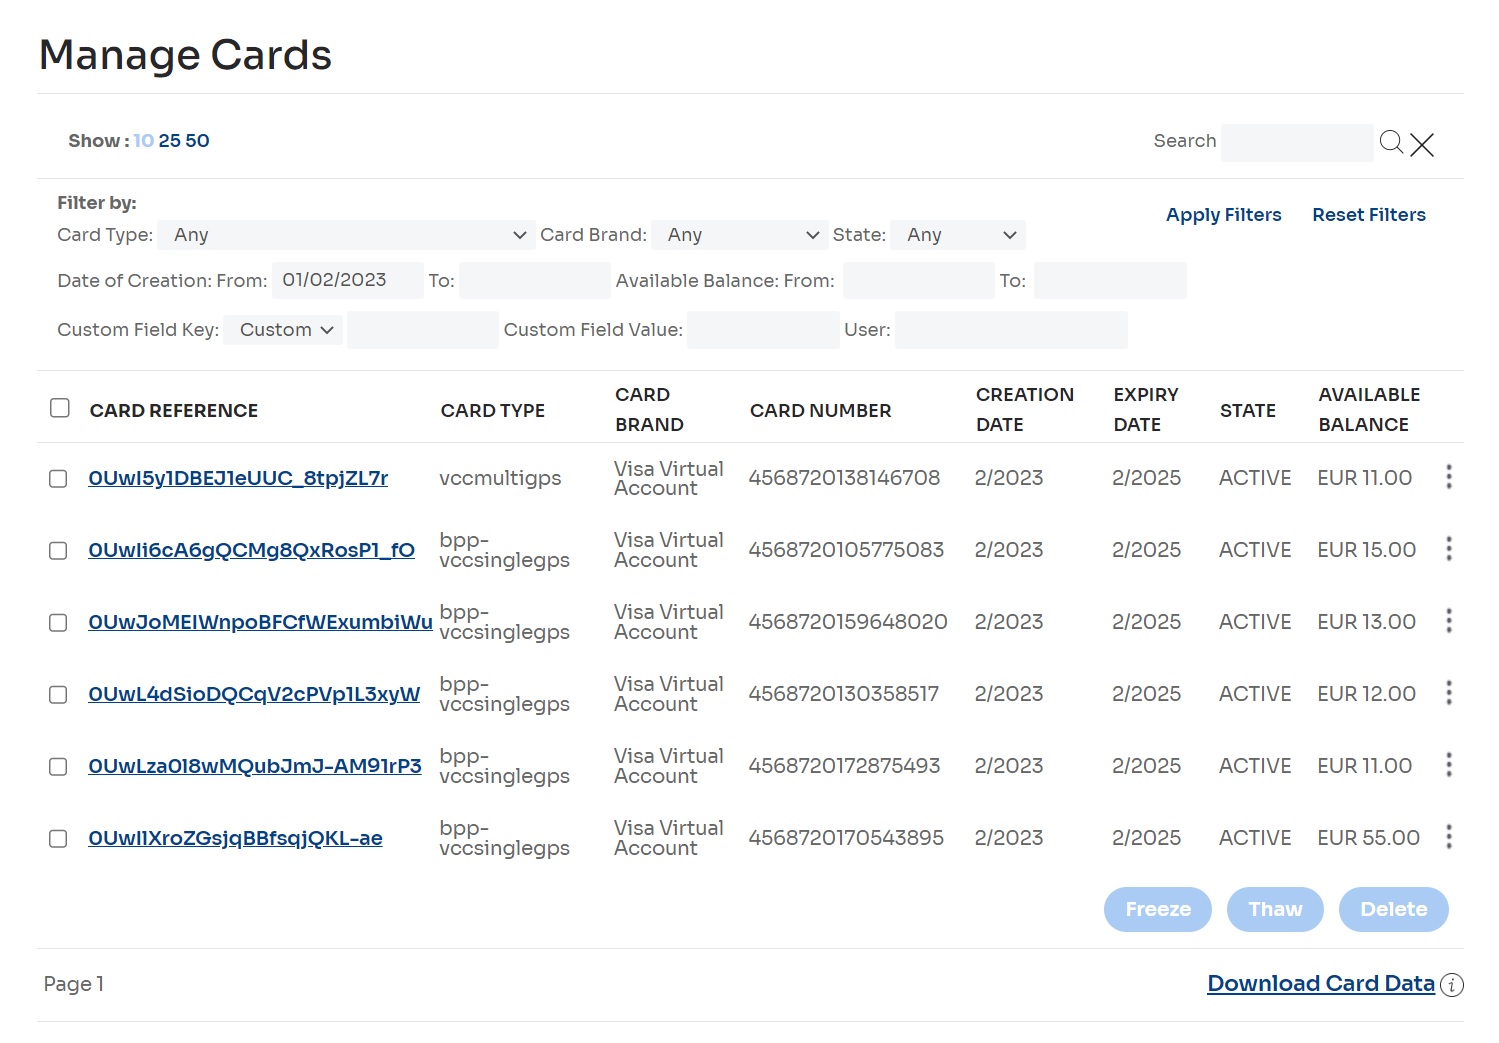
- If you need to modify the card list view:
- Select a value next to Show heading to modify the number of scheduled loads listed on a single page (10, 25, or 50).
- Enter or select values in the filter criteria fields (Funding Account, Currency, State, Schedule Date) and select the Apply Filters button to filter visible results.
- In the search box, you can also search by Card Number, Card reference, or Transaction reference.
- To export the card list to a file, select the Export Card Data link in the bottom right section of the page. (You can choose the Close button in the confirmation window to close it. The export process will not be aborted.)
When the file generation process is complete, the _Export Card Data link will be replaced by a Download File link. Select to download. - Select a value in the Card Reference column to view individual card details.
📘 NOTE
The Available Balance displayed on this page is the amount you can use or withdraw. It reflects the actual balance minus any pending transactions (like card authorizations, or holds) in addition to any incoming deposits that are pending clearance. The Actual Balance is the total amount of money in the account at a given point in time. It includes all posted transactions—both credits and debits—that have fully settled.
- If you need to change cards’ custom fields on the Card Details page:
- Select the Add Additional Details [+] link to add more detailed entries. You can add a maximum of 20 custom fields per card. By default, 5 fields are displayed.
- To delete entries, select the [x] icon to the right of the row of fields, or leave them blank.
📘 NOTE
Your deployment may have additional custom fields configured by default. You cannot change the name of mandatory fields or delete them. You must provide a value for mandatory fields. For any mandatory fields to be configured please contact support.
- You can modify scheduled loads for your cards on the Card Details page.
- You cannot change the amount and/or date of an existing scheduled load. You must delete the load and create a new one. Select the icon to delete an existing scheduled load.
- To add a new scheduled load, enter the _Amount _ and select the calendar icon to choose the Load Date.
Select the Save Changes button to add the scheduled load. - Select or change the Clearance Date.
Select a Clearance Date to delete your card on a specific date. Any money left on the card will be transferred to the designated funding account. Otherwise, cards are automatically deleted once they reach their maximum clearance date. Using this feature, helps to reduce the risk of fraud. One can only set a Clearance Date if you have at least one load scheduled on a card.
If you choose a Single Load Card Type during card creation, you can only load your card once, either at the same time you create the card or in a single scheduled load. An error will be reported if you try to load it more than once. (This feature is typically used by customers who want to maintain tight control over card usage.)
📘 NOTE
The maximum clearance date can be modified by Nium Operators. Please contact support for configuration.
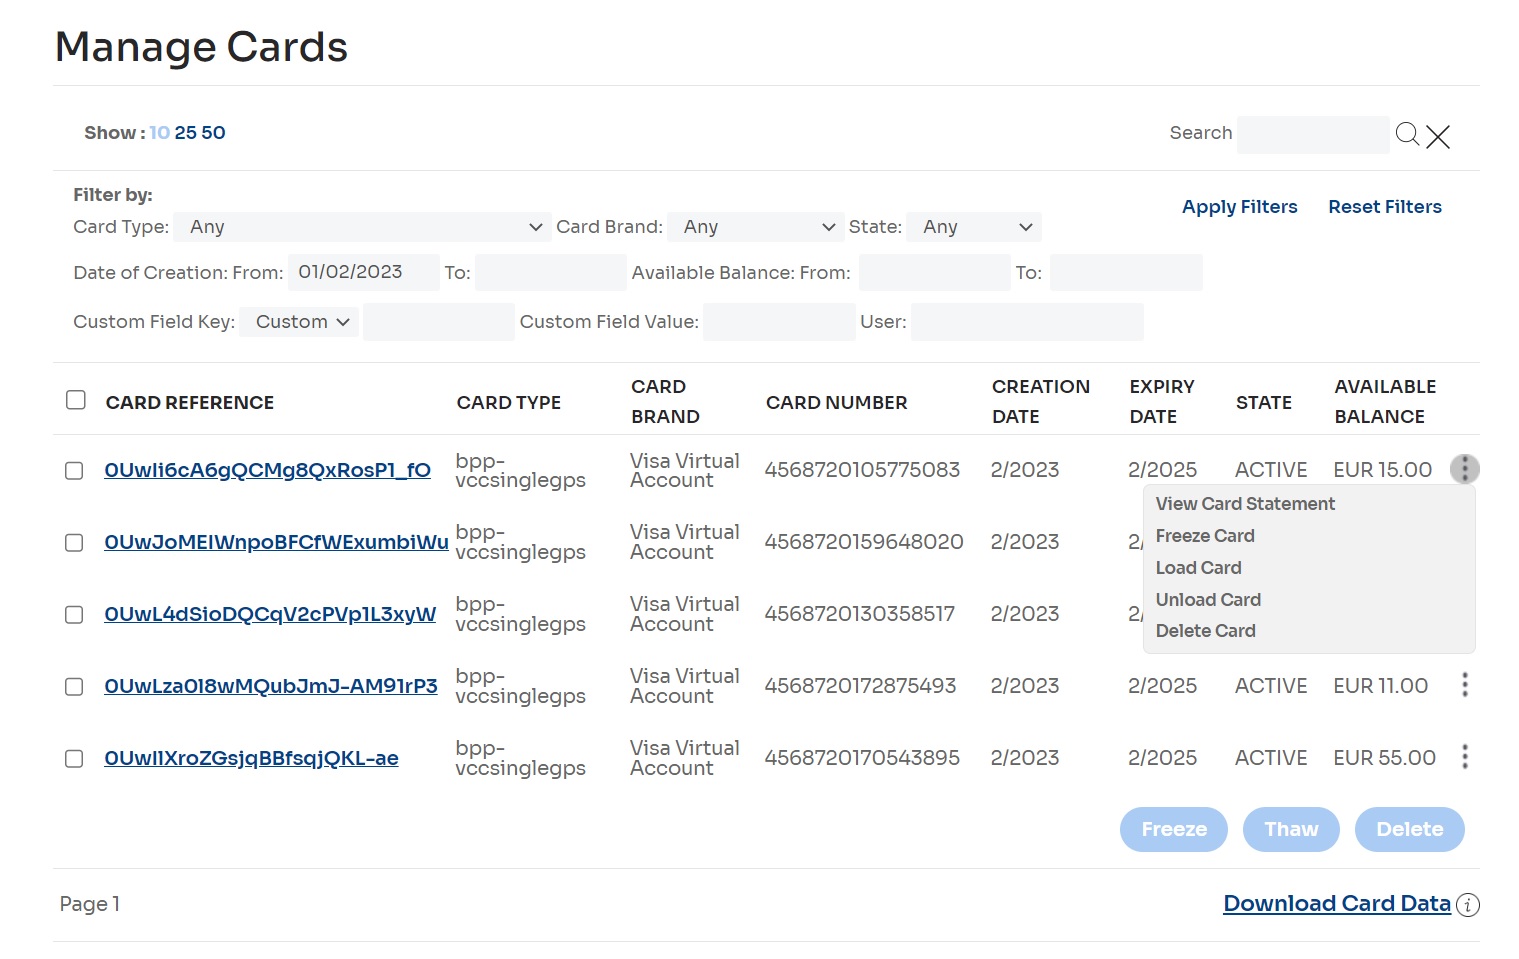
- On the Manage Cards page, select the ⋮ icon to manage a single card:
- Select View Card Statement to view the card statement. See Viewing the card statement for more information.
- Select Freeze Card to freeze the card. See Freezing cards for more information.
- Select Thaw Card to thaw the card. See Thawing cards for more information.
- Select Load Card to load the card. See Loading a card for more information.
- Select Unload Card to unload the card. See Unloading funds from a card for more information.
- Select Delete Card to delete the card. See Deleting cards for more information.
- To manage several cards at a time, select the checkboxes next to them in the first column and choose the action you want to take:
- Select the Freeze button to freeze the selected cards. (Only the cards that can be frozen will be included in the operation).
- Select the Thaw button to thaw the selected cards. (Only the cards that can be thawed will be included in the operation).
- Select the Delete button to delete the selected cards.
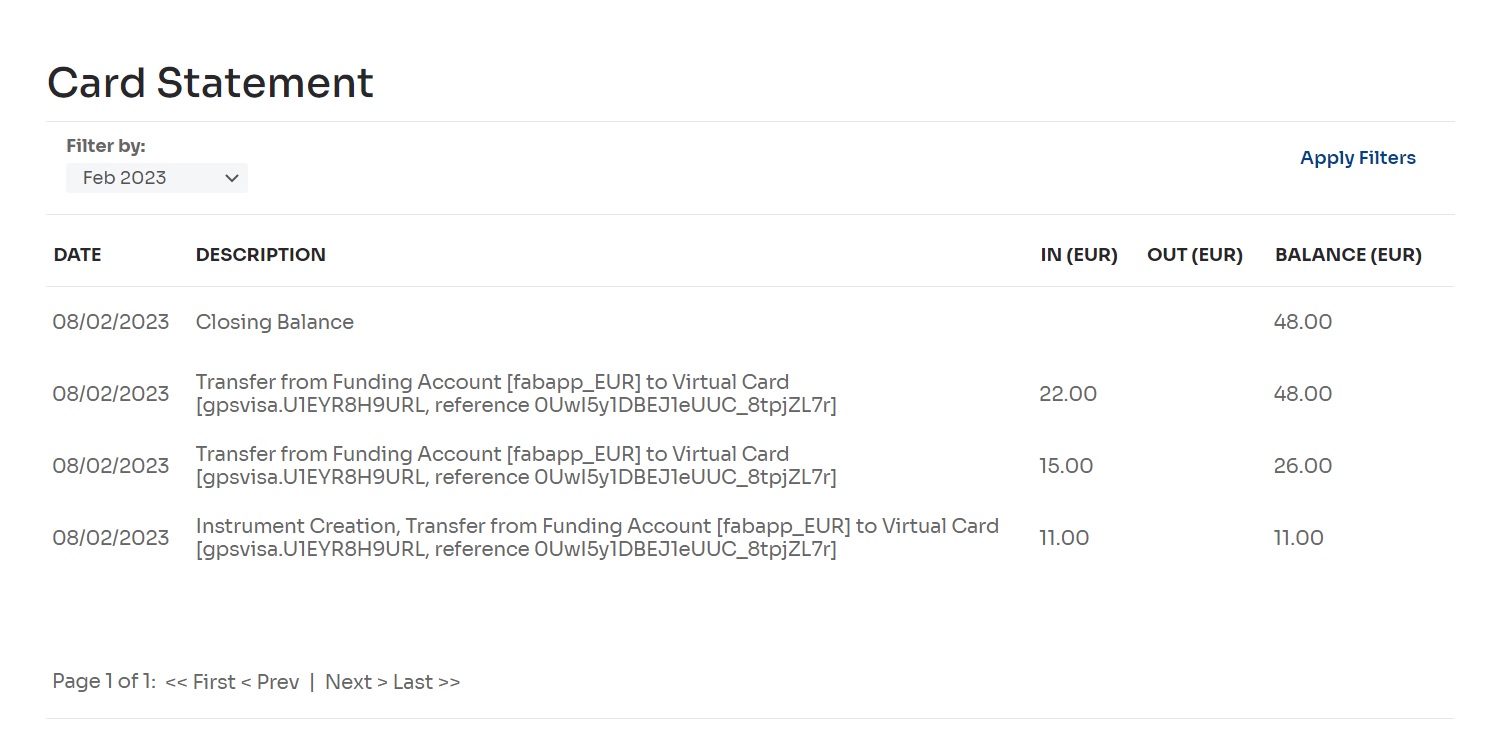
Viewing the card statement
The card statement helps you keep track of card balances and review transaction activity for a specific card.
- Select Cards > Manage Cards.
The Manage Cards page is displayed. - Select the ⋮ icon in the row representing the card you want to view the statement.
The action menu is displayed. - Select View Card Statement.
The Card Statement page is displayed.
Freezing cards
You can freeze active cards individually or as a batch.
- Select Cards > Manage Cards to access the Manage Cards page.
• To freeze a single card:- Select the ⋮ icon in the row that represents the card to be frozen.
The action menu is displayed. - Select Freeze Card.
- Select the ⋮ icon in the row that represents the card to be frozen.
- To freeze multiple cards at once:
i. In the first column, select the checkboxes next to the cards you want to freeze.
ii. Select the Freeze button.
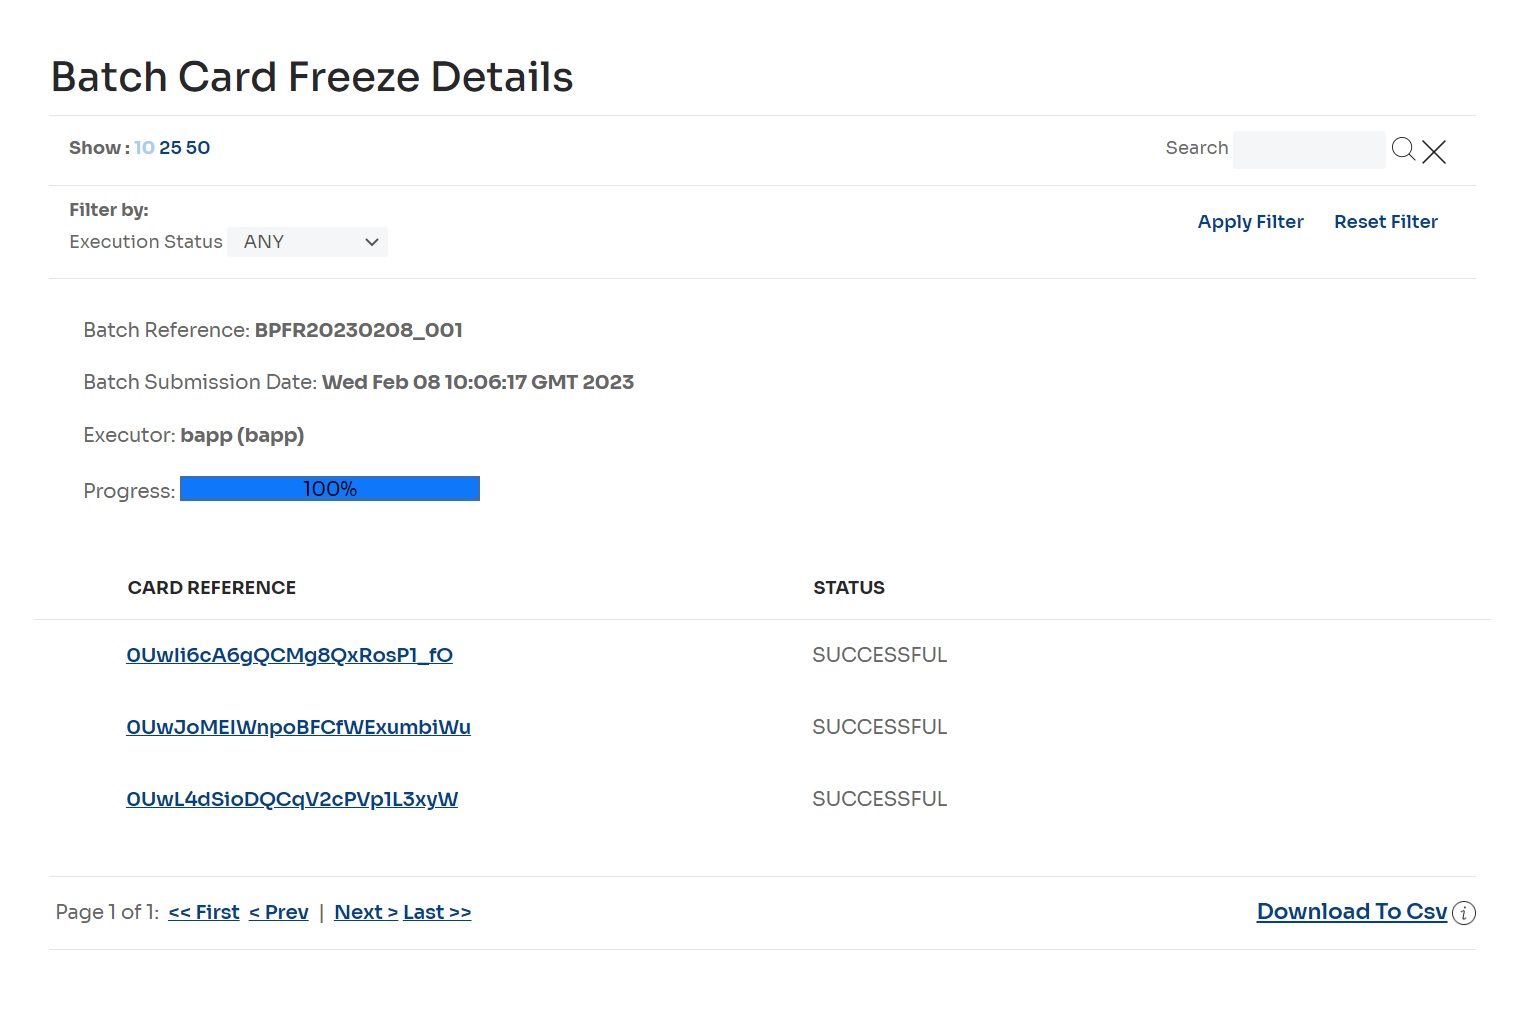
A batch reference is generated, and the Batch Card Freeze Details report page is displayed.
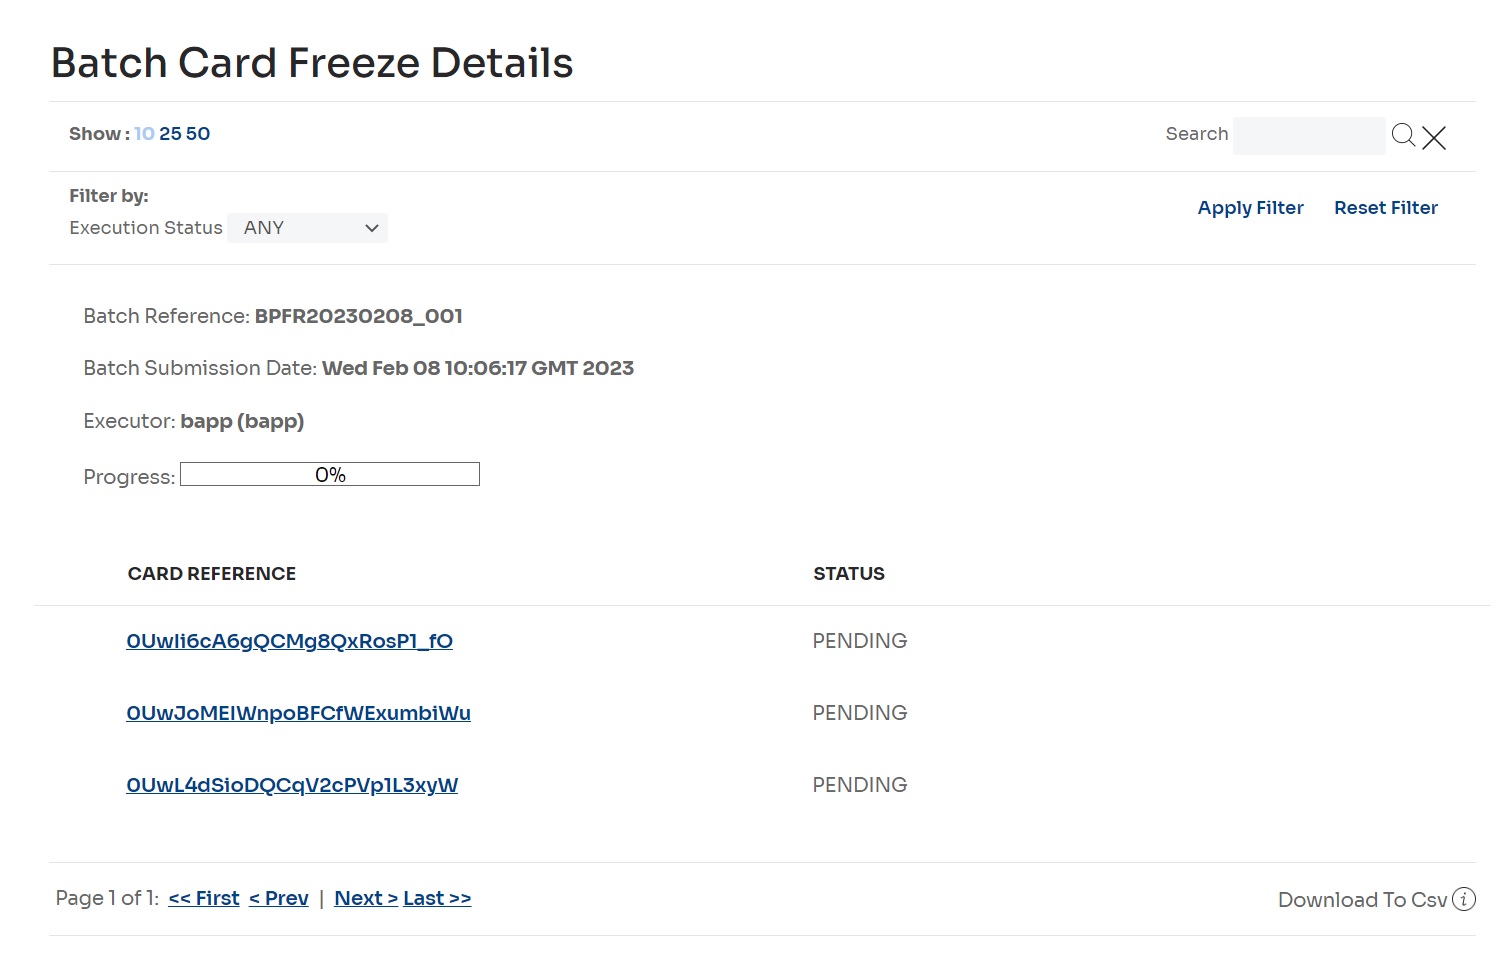
The generated batch reference can be used later to search for reports.
Thawing cards
You can thaw inactive cards individually or as a batch.
- Select Cards > Manage Cards to access the Manage Cards page.
- To thaw a single card:
- i. Select the ⋮ icon in the row that represents the card to be thawed.
The action menu is displayed.
ii. Select Thaw Card. - To thaw multiple cards at once:
i. In the first column, select the checkboxes next to the cards you want to thaw.
ii. Select the Thaw button.
A batch reference is generated and the Batch Card Thaw Details report page is displayed.
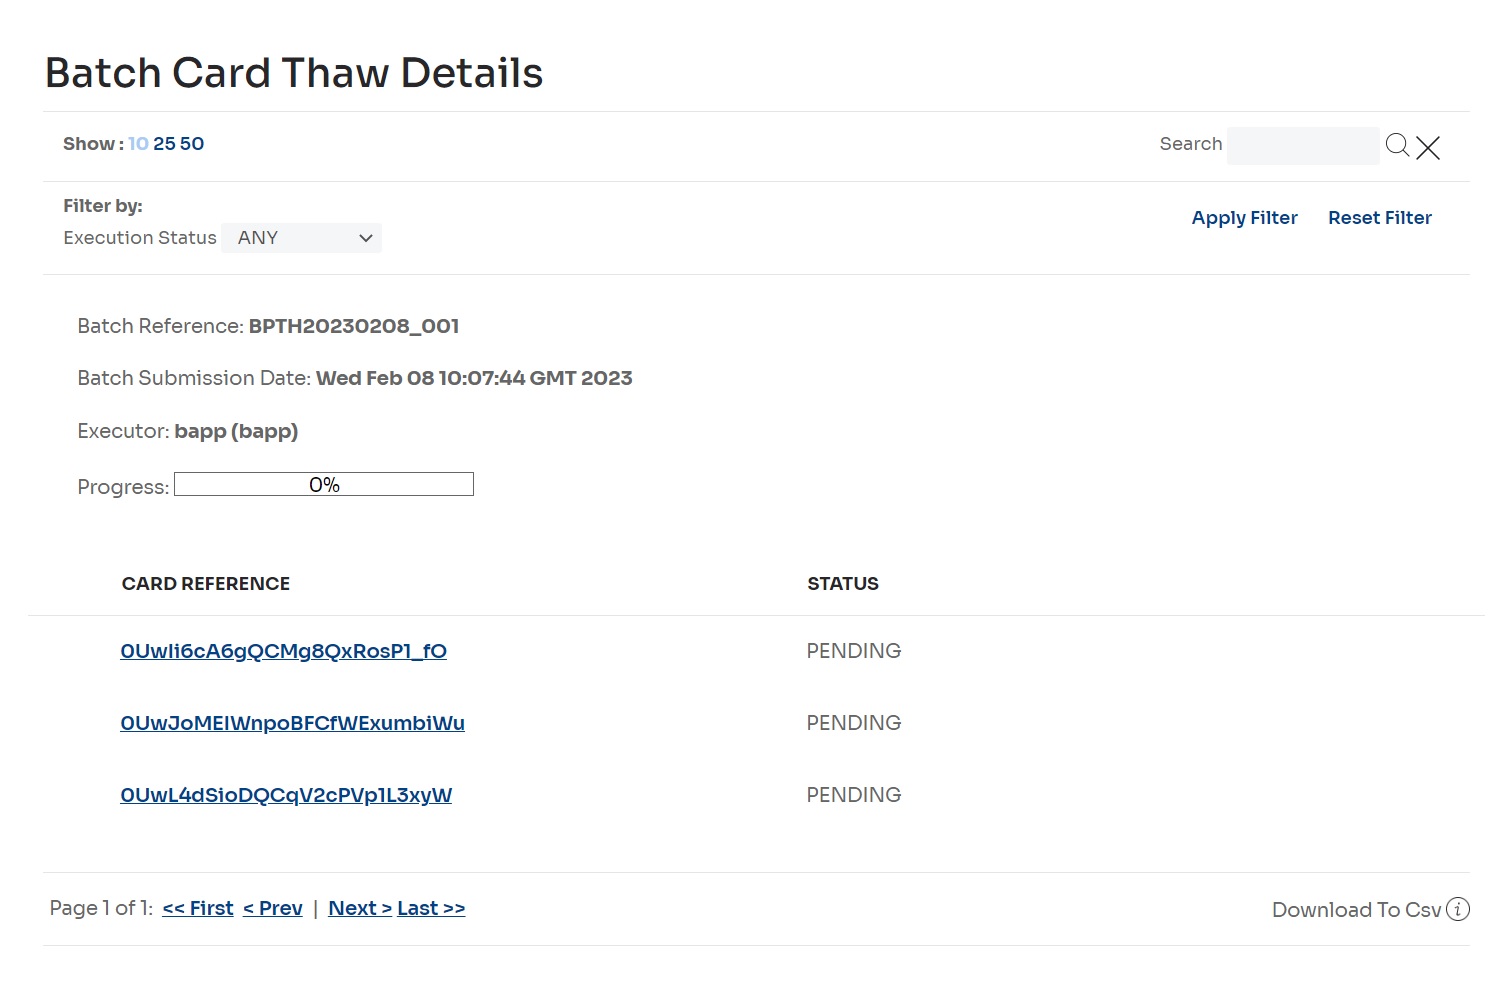
iii. The generated batch reference can be used later to search for reports. For more information, see Viewing Card Batches.
Deleting cards
You can delete cards individually or as a batch. When cards are deleted, any money remaining on them is transferred to the default funding account. For more information, see
To delete a card(s):
- Select Cards > Manage Cards to access the Manage Cards page.
- To delete a single card:
i. Select the ⋮ icon in the row that represents the card to be deleted.
The action menu is displayed.
ii. Select Delete Card.
- To delete a single card:
- To delete multiple cards at once:
i. In the first column, select the checkboxes next to the cards you want to delete.
ii. Select the_ Delete button._
A batch reference is generated, and the Batch Card Delete Details report page is displayed.

- The generated batch reference can be used later to search for reports. For more information, see Viewing Card Batches.
View card history
To view card history, use the Card History page.
- Select Cards > Card History.
The search page of the Card History page is displayed.
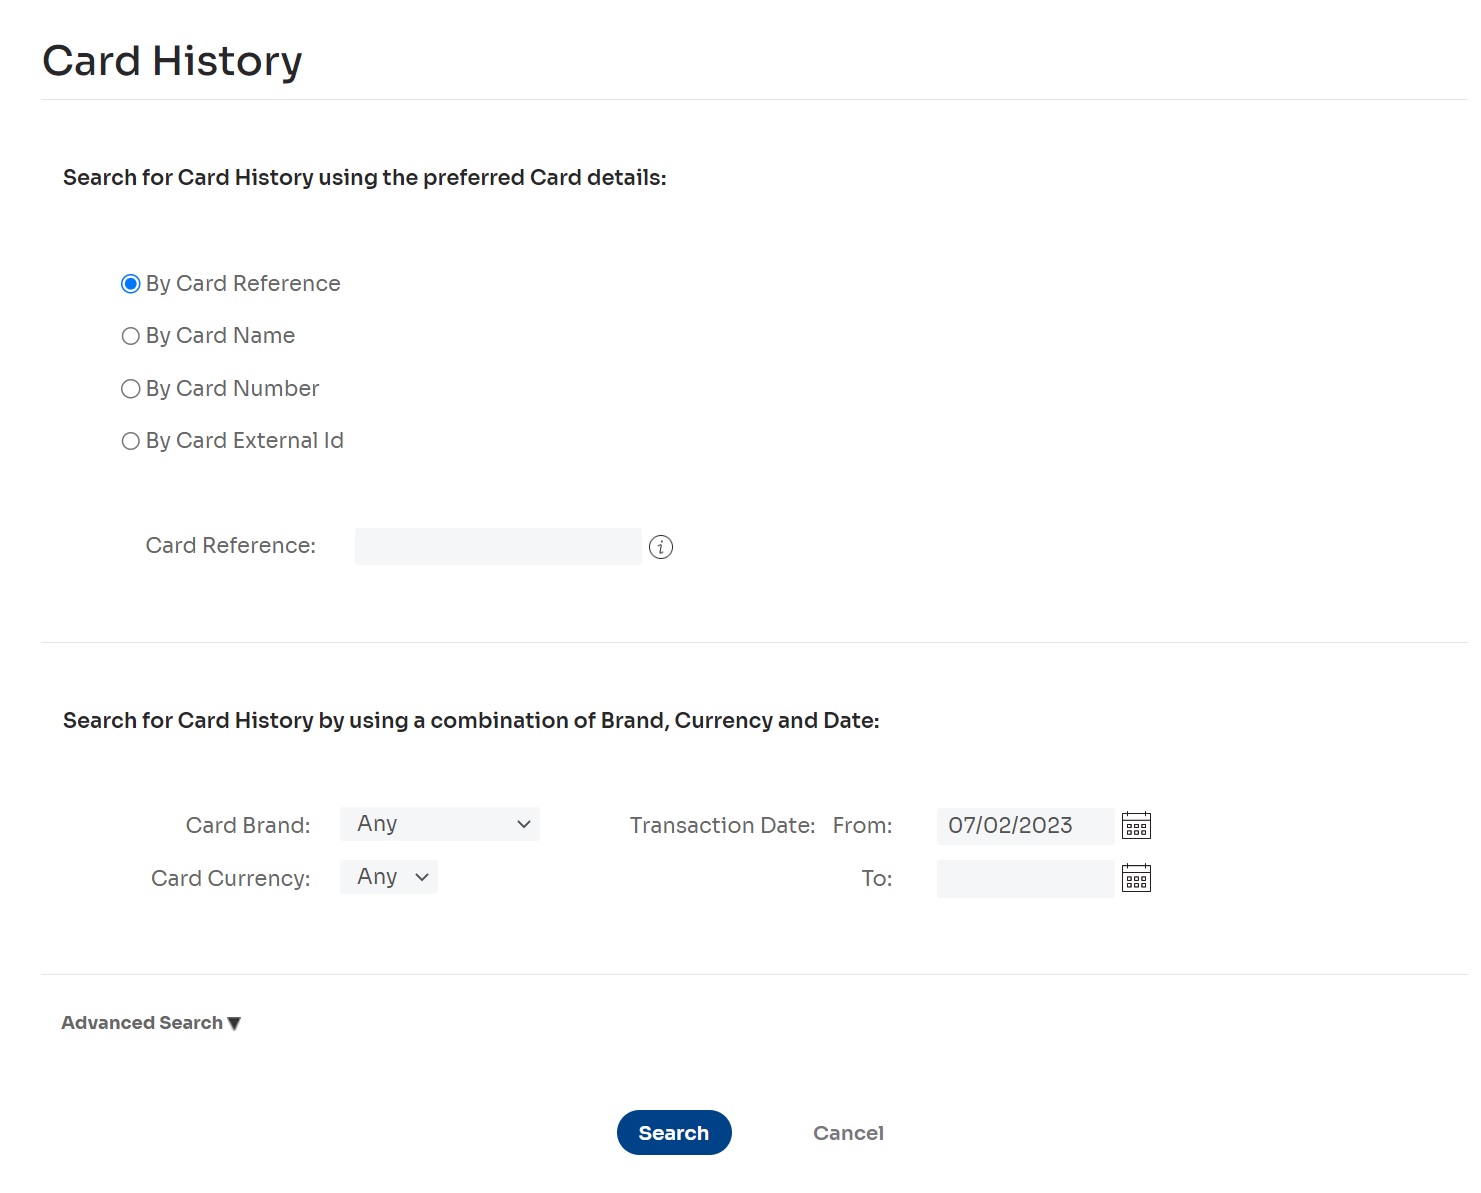
- Provide the card history search criteria:
- To search using the unique external identifier of the card, select the By Card Reference radio button and enter the card reference in the Card Reference field.
- To search using the unique name of the card, select the By Card Name radio button and enter the card name in the Card Name field.
- To search using the card's unique number, select the By Card Number radio button and enter the card number in the _ Card Number_ field.
- To search using the unique user-defined external ID of the card, select the By Card External ID radio button and enter the ID in the Card External ID field.
- To add a card brand criterion to the search, select a card brand from the Card Brand drop-down list.
- Select a currency from the Card Currency drop-down list to add a card currency criterion to the search.
- To add a transaction date range criterion to the search, enter or select dates in the From and To fields next to Transaction Date.
📘 NOTE
By Card Reference, By Card Name, By Card Number, and By Card External ID are mutually exclusive search criteria. You can only select one of them. The remaining criteria can be added to the search and are not exclusive.
- If you need to add more advanced search criteria, select Advanced Search:
- To add the unique external identifier of the transaction as a search criterion, enter this in the Transaction Reference field.
- To add the transaction type as a search criterion, select this from the Transaction Type drop-down list.
- To add the currency of the transaction as a search criterion, select this from the Transaction Currency drop-down list.
- To add the transaction status as a search criterion, select this from the Transaction Status drop-down list.
- To add the transaction amount as a search criterion, enter this in the Transaction Amount field.
To add detail parameters as search criteria, enter the Name and Value fields in the Additional Details section. (These are optional details you entered when a card was created.)
- Select the Search button to display a list of card history entries that match the search criteria.
The result page of the Card History page is displayed.
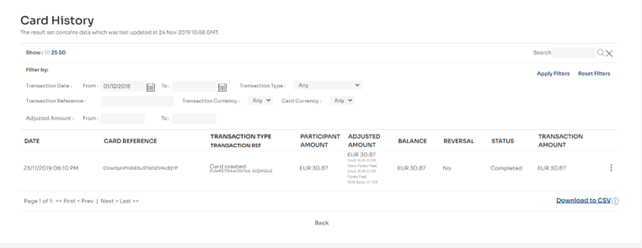
- To view details of a specific card, select the vertical 3 dots icon in any row and choose View all details.
The Card History Details page is displayed.

For a detailed explanation of the fields you may see on the Card History Details page, see Appendix: Card History Details.
- You can also export the list of card history entries to a file:
- Select the Export to CSV link below the list of entries on the Card History page. (You can select the Close button in the confirmation window to close it. The export process will not be aborted.)
When the file generation process is complete, the Export to CSV link will be replaced by a Download File link. Select to download.
- Select the Export to CSV link below the list of entries on the Card History page. (You can select the Close button in the confirmation window to close it. The export process will not be aborted.)
Appendix : View card history details
This explains the fields on the Card History Details page.
| Field | Description |
|---|---|
| Start Date | The date when the transaction started. |
| Transaction Date | The date when the balance movement was performed. |
| Community | The name of the community that a client belongs to, as set up in Nium. |
| Client | The name of the client (your company) as set up in Nium |
| Transaction Reference | A unique transaction identifier. |
| Adjustment Reference | A unique identifier for each balance movement. NOTE: A transaction can have multiple balance movements. |
View authorisations and card references
You can view a list of authorizations for a specific card on the Authorisations page.
- Select Cards > Authorisations.
The Authorisations page is displayed.
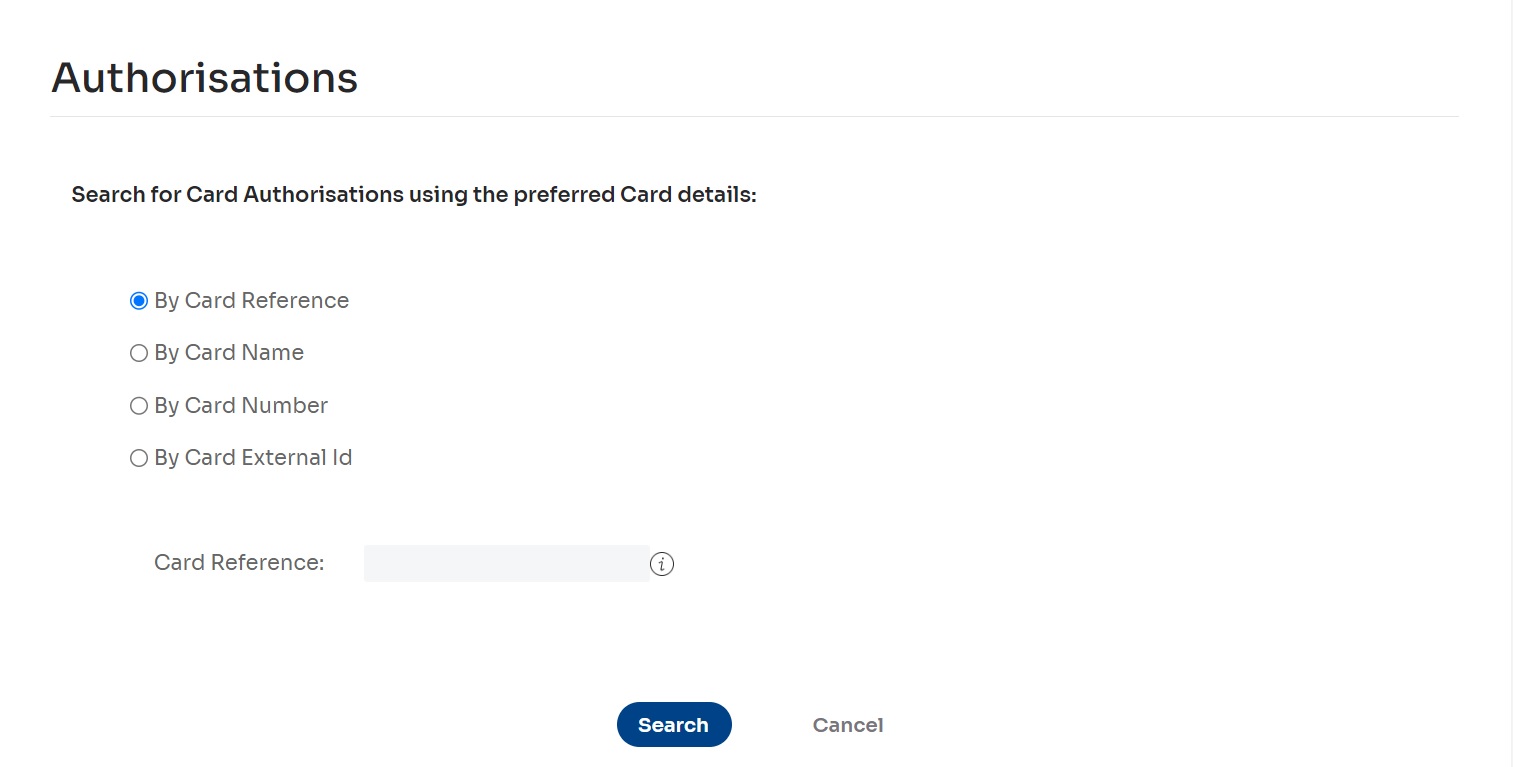
- Enter your search criteria:
- To search using the unique external identifier of the card (our recommended method), select the By Card Reference radio button and enter the card reference in the Card Reference field.
📘 Note:
You can find the Card Reference on the Manage Cards page in the Card Reference column or on the_ Card Details_ page in the Card Reference field.
If you need to find and copy the Card Reference for a card, use the operating system copy function (for example, Ctrl + C).
- To search using the unique name of the card, select the By Card Name radio button and enter this in the Card Name field.
- To search using the card's unique number, select the By Card Number radio button and enter this in the Card Number field.
- To search using the unique user-defined external ID of the card, select the By Card External ID radio button and enter this in the Card External ID field.
- Select the Search button to display a list of authorizations for the selected virtual card.
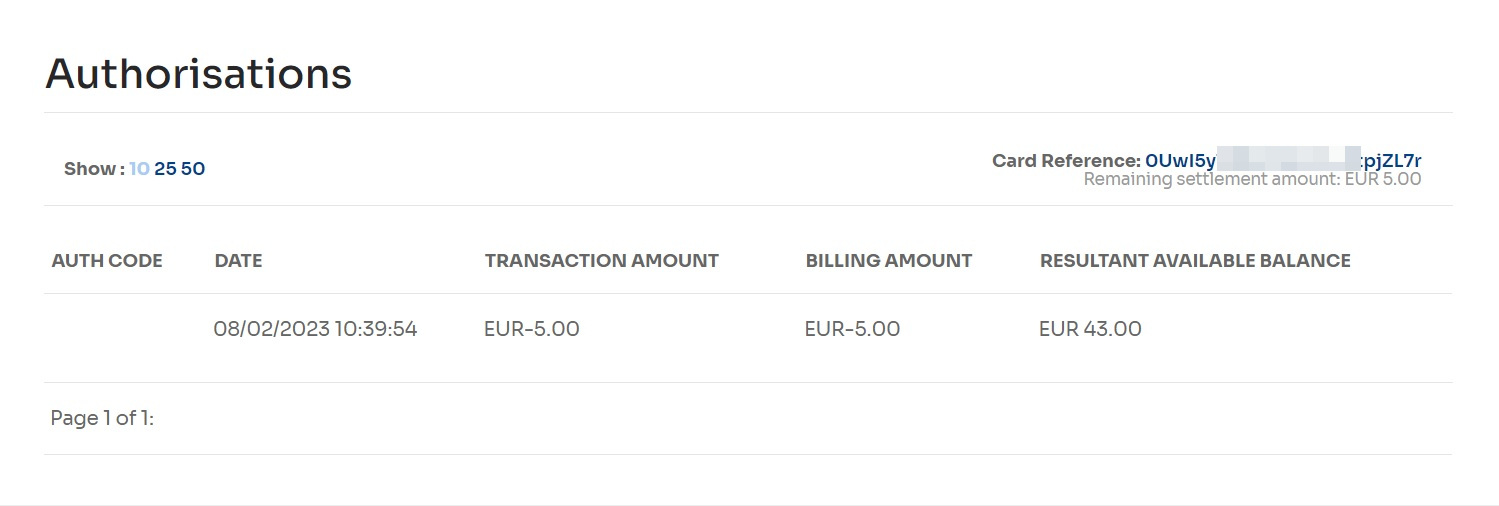
The result page of the Authorisations page is displayed.
Viewing card batches
You can view all card actions performed using batches.
- Select Cards > Card Batches.
The Card Batches search page is displayed.
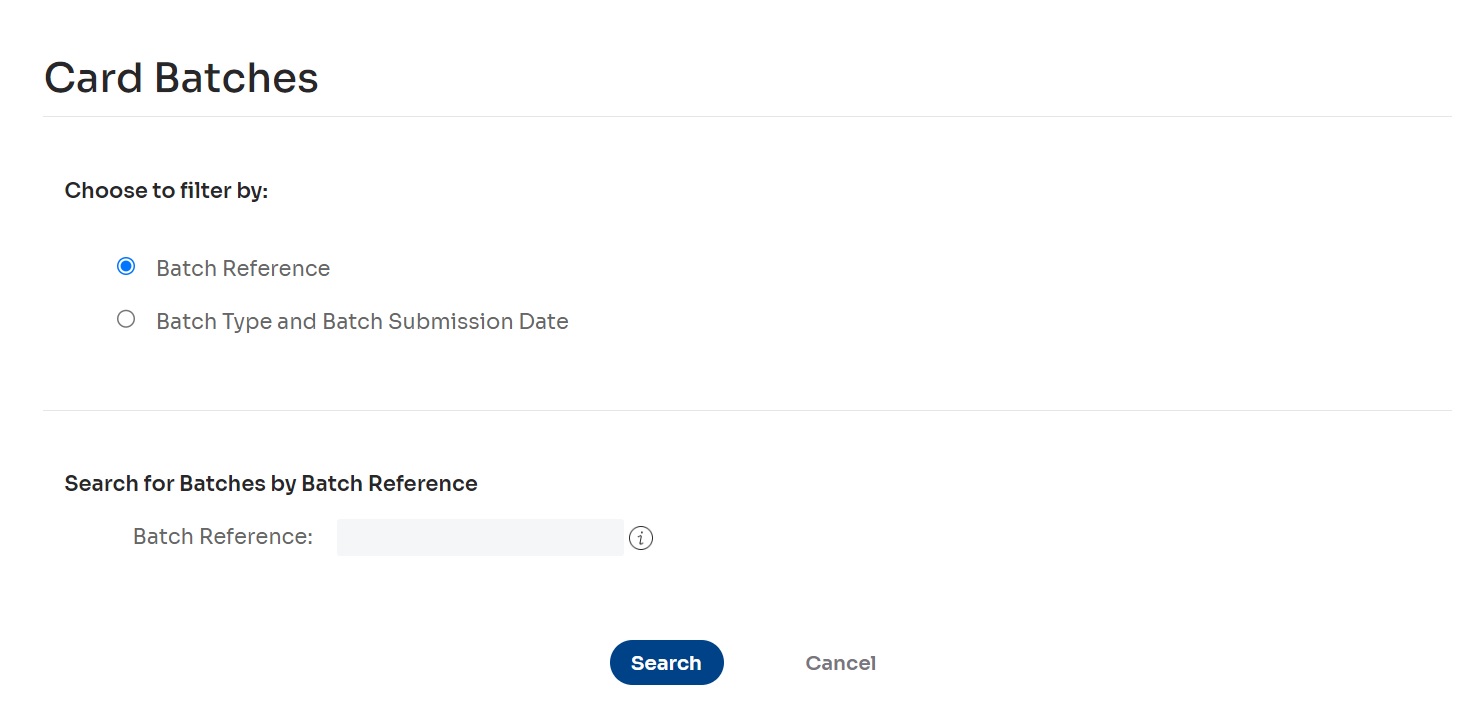
- Select how you want to search for card batches:
- Select the Batch Reference radio button to search by batch references and enter the Batch Reference in the text field. (You can use wildcard symbols [*] in this field.)
- To search by batch type and submission date, select the Batch Type and Batch Submission Date radio button, the Batch Type, and one of the radio buttons for Batch Submission Date options (for example, Yesterday) and enter or select dates for a Custom Range.
To view a list of all card batches, leave the default settings.
- Select the Search button.
The Batch Card Reports page displays batch operations that match your search criteria.
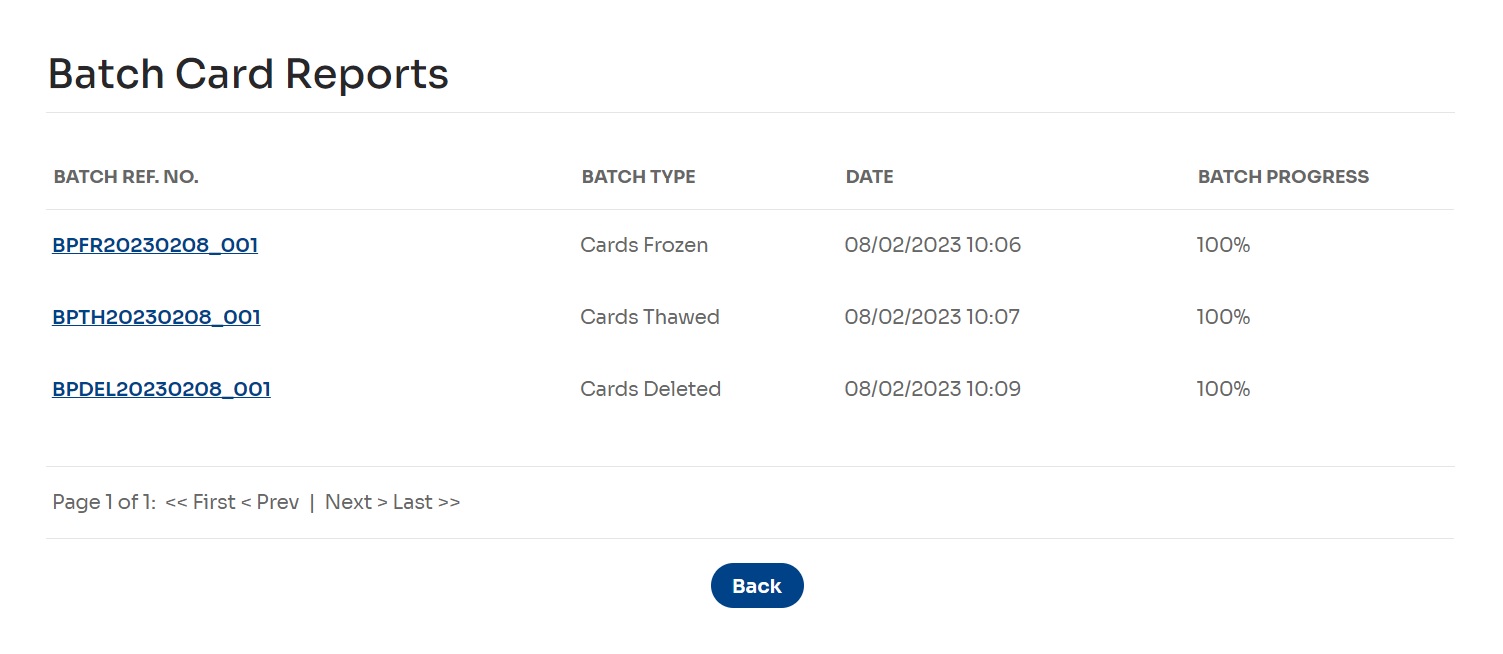
- Select any value in the Batch Ref. No. column to view the details of a batch.
A page displays the selected card batch. The page name and type depend on the batch operation type.