Creating and Managing Balanceless Cards
📘 NOTE
Feature availability may vary based on the region and the applicable balanceless model. This includes:
- Balance Creation
- Transfer between Balance instruments
- Withdrawal of funds
Creating a Balanceless Card
You can create a balanceless card on the Create Card page.
-
Select Cards > Create Card > Single
The Create Card page is displayed. -
Complete the following fields:
- Select the Card Type: determines card features, such as card brand, spend type (multi-spend or single-spend), and product type.
- Select the Currency: defines the currency of the card you’re creating.
- Enter the Spend Limit: defines the maximum amount of funds that can be authorised for transactions on the card.
- Define the Closure Date: defines the date and time when the card will automatically be closed.
- Select the Balance: identifies the Balance instrument to which the card will be associated.
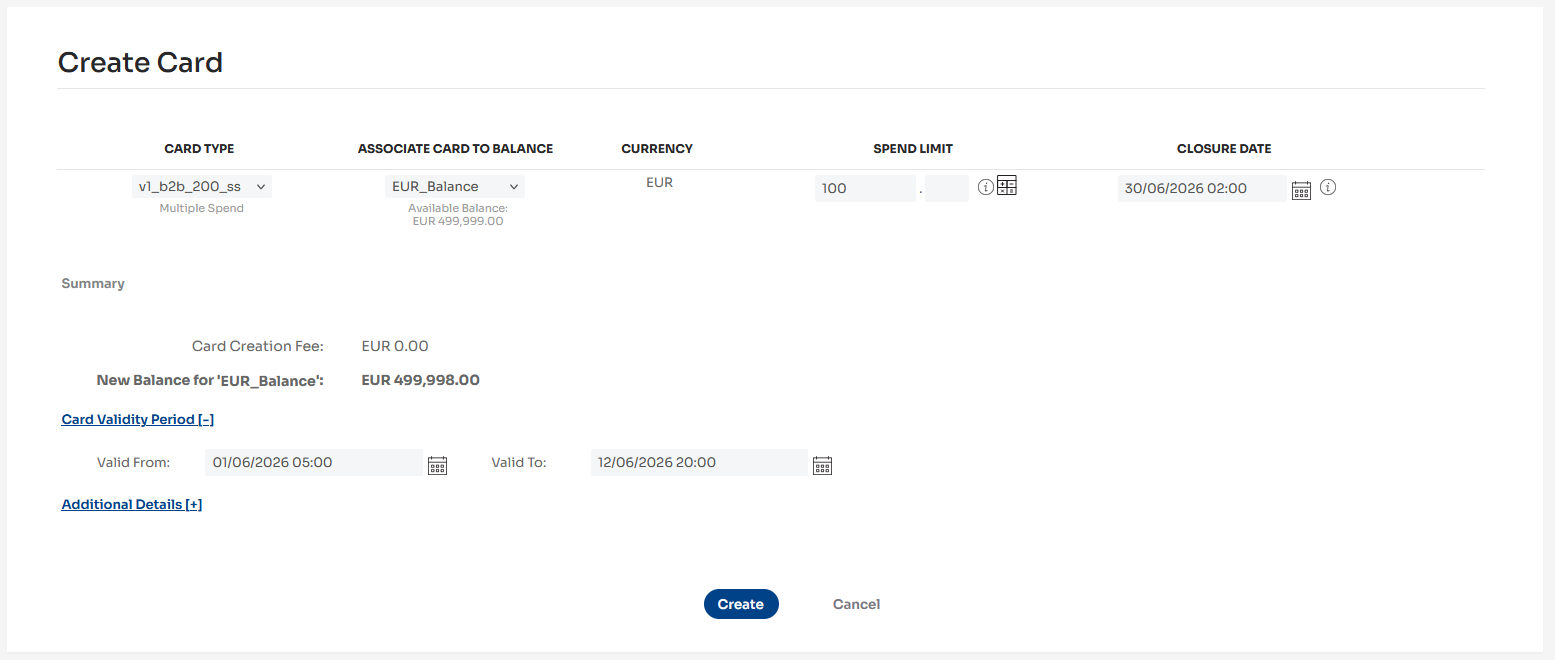
- Optionally, define the Card Validity Period.
- The Card Validity Period allows clients to define when a Balanceless Card is logically usable for authorisations.
- Valid From: Defines the date and time from which the card becomes usable for authorisation
- Valid To: Defines the date and time after which the card can no longer be used for authorisations.
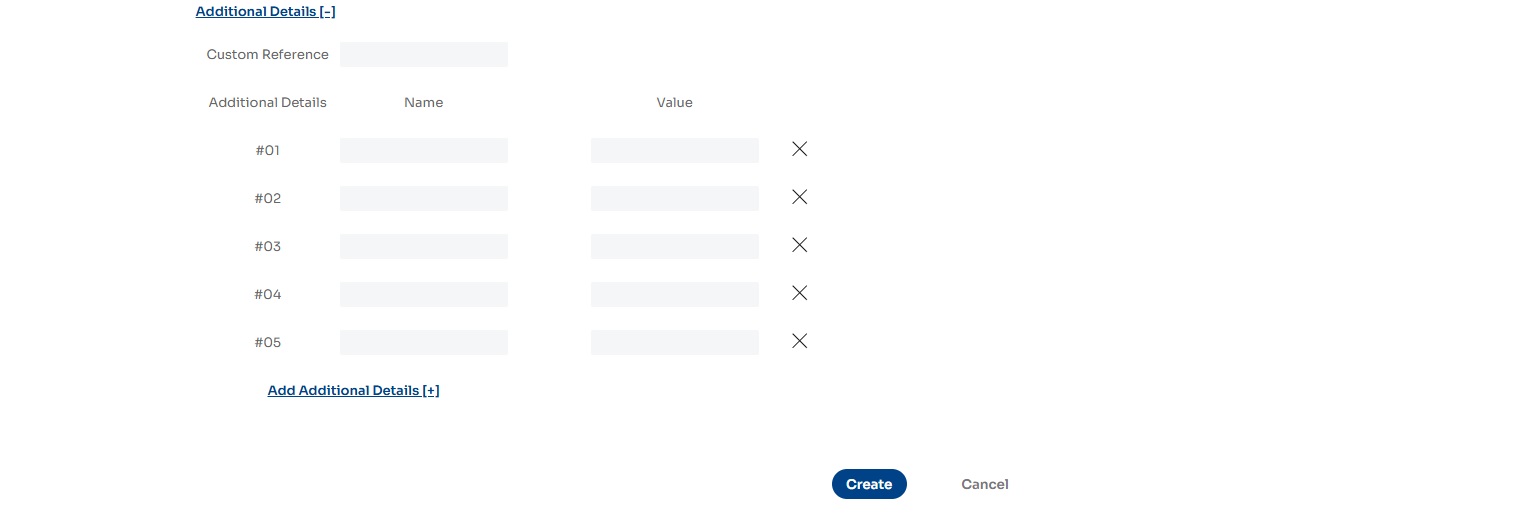
- Optionally, add details to the card being created by selecting the Additional Details [+] link.
- The Custom Reference can be used to uniquely identify the card.
- Additional Details allows custom data to be added to the card, such as a booking reference number or department name.
- Up to 20 custom detail entries can be added, with five displayed by default.
- Select the Add Additional Details [+] link to add more entries if required.
- If entries are not needed, they can be deleted or left blank. To delete, select the [x] icon to the right of the row of fields.
📘 NOTE
Your deployment may include additional detail (also known as tags) entries configured by a Nium operator.
This configuration pre-populates the name of the set tag(s) for every card creation.These fields can be set as either optional or mandatory:
- Optional tags allow the Name to be modified and can be deleted if not required.
- Mandatory tags cannot be deleted or renamed, and a value must always be provided for card creation to be successful.
- Select the Create button to create the card.
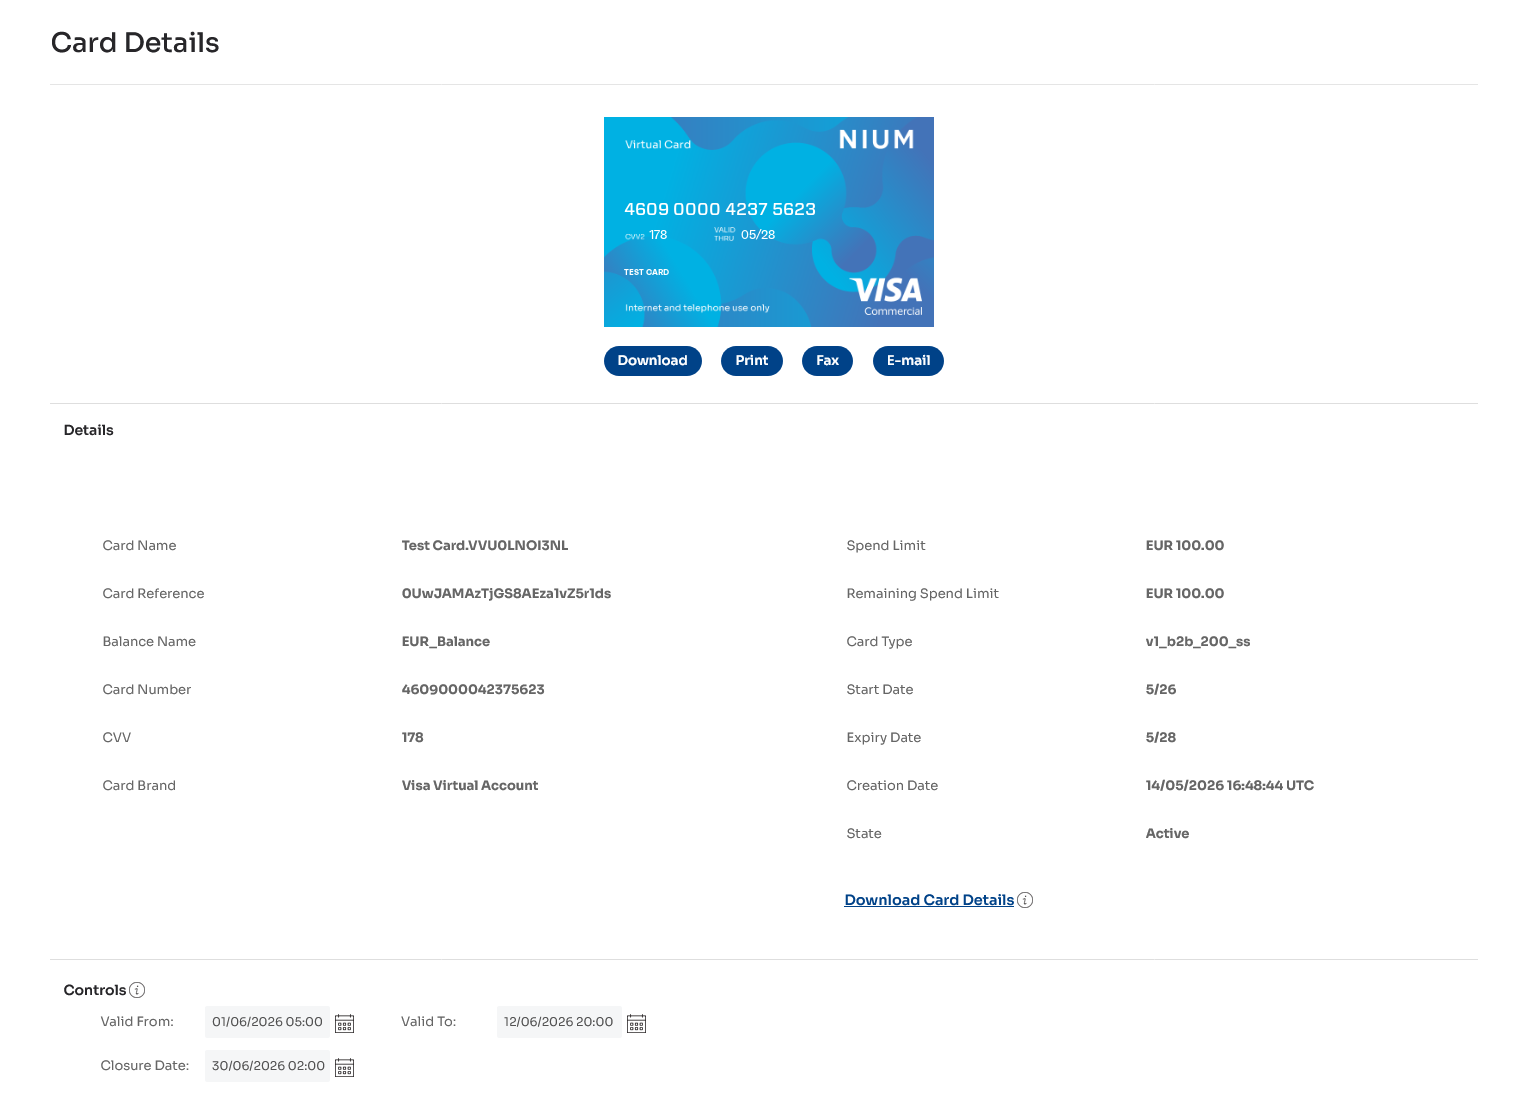
The card is created, and the Card Details page is displayed.
-
Select the Download button below the card image to save the card image.
-
Select the Print button below the card image to print the card image.
-
Select the E-mail button to share the card image and details via email.
On the Email Card Image page:
- Enter the required details:
- Email Address
- Invoice Currency
- Invoice Amount
- Accompanying Text (optional)
If available in your deployment, you can add a custom message or select a predefined email template from the drop-down.
- Enter the required details:
📘 NOTE
The Invoice Currency and Invoice Amount fields do not affect the card in any way. These are for display purposes only in the email sent to your supplier.
💡 TIP
To configure an email template, contact our client support team at clientsupport@nium.com.
- Select the Send button to send the email. The recipient will receive a link to view the card image and details.
- To view the status of the email, scroll to the Link History section at the bottom of the Card Details page.
- This section logs each link sent by email or API.
- Links expire automatically when:
- The card is deleted
- The link is opened three times
- A new link is sent (only one active link per card is allowed)
- The recipient can view the card image and details until the link expires.
- Select the [X] icon in the Actions column to manually expire a link.
- To export card information to a file, select the Download Card Details link at the bottom right of the page.
The card details will be downloaded in.csvformat.
Viewing and Managing Cards
View card details and perform card actions from the Manage Cards page.
-
Select Cards > Manage Cards.
The Manage Cards page is displayed.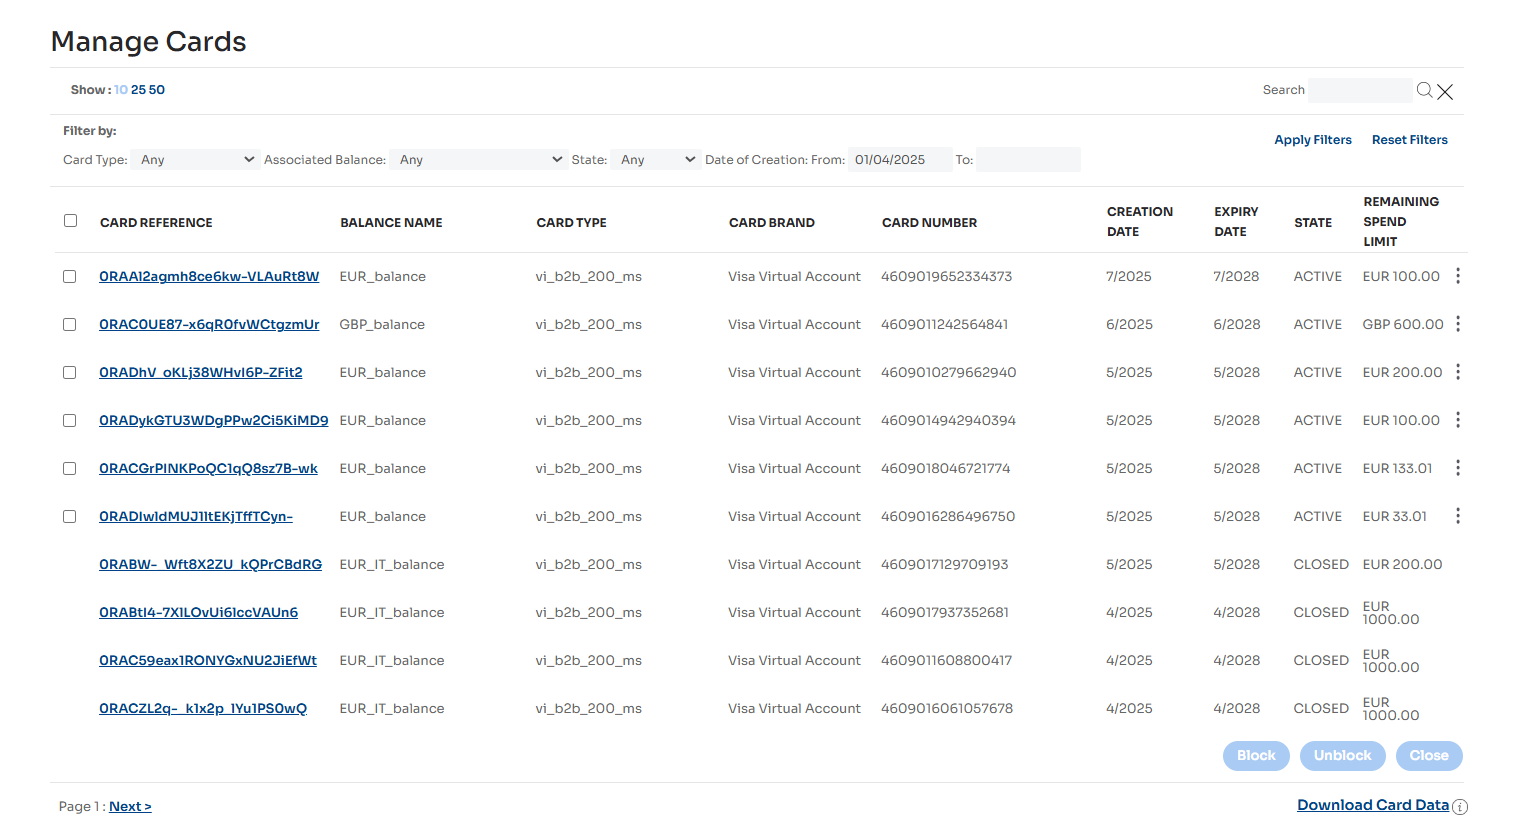
-
To modify the card list view:
- Select a value beneath Manage Cards to change how many cards are listed per page (10, 25, or 50).
- Use the filter criteria fields — Card Type, Associated Balance, State, Date of Creation — and select the Apply Filters button to refine visible results.
- In the search box, search by Card Number or Card Reference.
-
To export the card list:
- Select the Download Card Data link in the bottom-right of the page.
- You may close the confirmation window without aborting the export process.
- Once the file is generated, the link will update to Download File. Select it to download the file.
-
To view card details, select a value in the Card Reference column.
-
To change a card’s tags on the Card Details page:
- Select Add Additional Details [+] to include more entries. You may add up to 20 tags per card. Five are shown by default.
- To remove entries, select the [x] icon to the right of the row, or leave the field blank.
📘 NOTE
Your deployment may include default tags configured by a Nium operator.
- Mandatory fields cannot be renamed or deleted, and a value must be provided.
- For support with configuring mandatory fields, contact our client support team at clientsupport@nium.com.
-
To manage an individual card, select the ⋮ icon on the Manage Cards page and choose from the following actions:
- Block Card – See Blocking cards for details.
- Unblock Card – See Unblocking cards.
- Update Spend Limit – See Updating spend limit.
- Close Card – See Closing cards.
-
To manage multiple cards at once:
-
Select the checkboxes next to the desired cards.
-
Choose from the following bulk actions:
- Block – Only cards that are currently unblocked will be affected.
- Unblock – Only cards that are currently blocked will be affected.
- Close – All selected active cards will be closed.
-
Blocking Cards
You can block active cards individually or in bulk.
- Select Cards > Manage Cards to open the Manage Cards page.
To block a single card:
- Select the ⋮ icon in the row of the card you want to block.
The action menu is displayed. - Select Block Card.
To block multiple cards:
- In the first column, select the checkboxes next to the cards you want to block.
- Select the Block button.
A batch reference is generated, and the Batch Card Block Details report page is displayed.
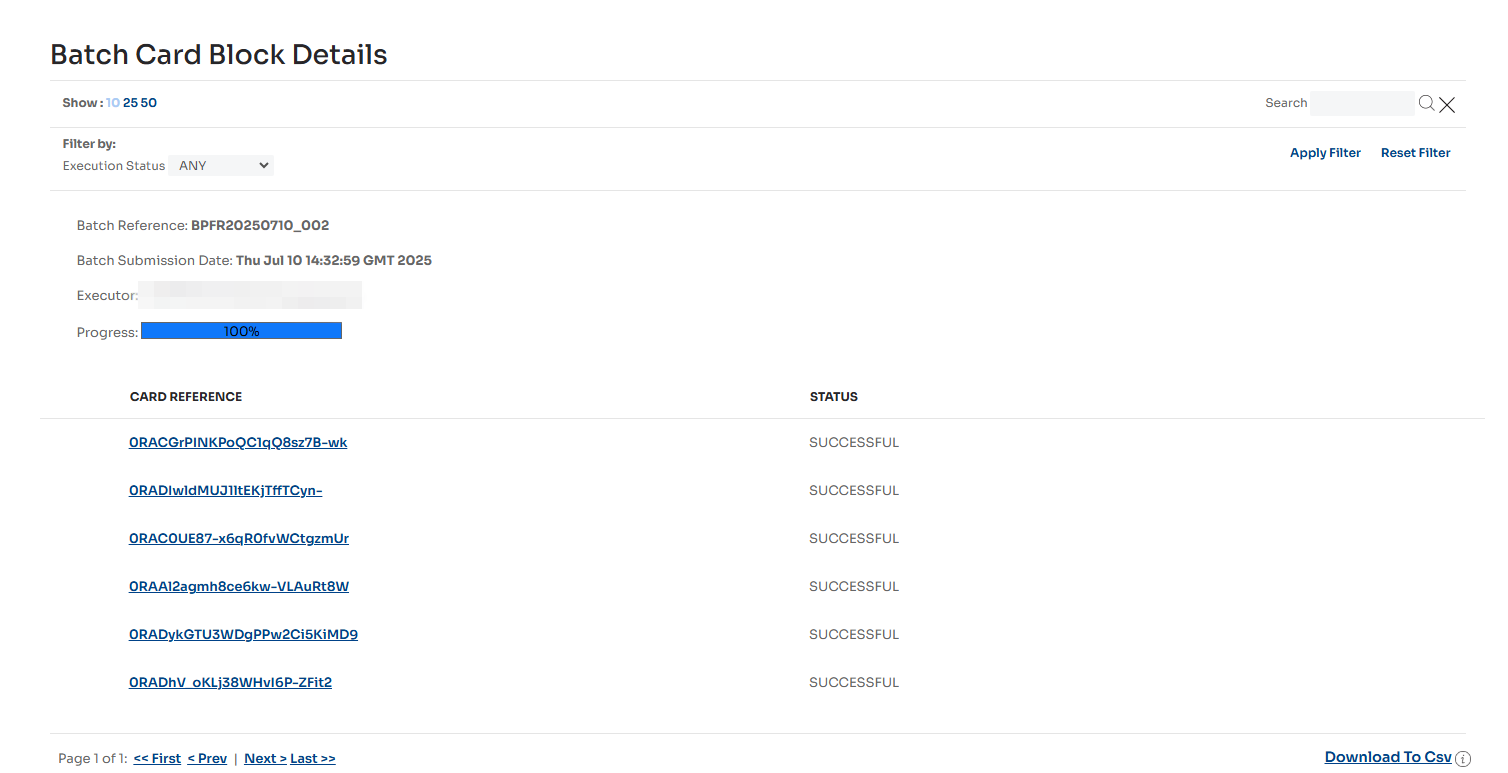
- The generated batch reference can be used later to search for reports.
For more information, see Viewing Card Batches.
Unblocking Cards
You can unblock inactive cards individually or in bulk.
- Select Cards > Manage Cards to access the Manage Cards page.
To unblock a single card:
- Select the ⋮ icon in the row that represents the card to be unblocked.
The action menu is displayed. - Select Unblock Card.
To unblock multiple cards:
- In the first column, select the checkboxes next to the cards you want to unblock.
- Select the Unblock button.
A batch reference is generated, and the Batch Card Unblock Details report page is displayed.
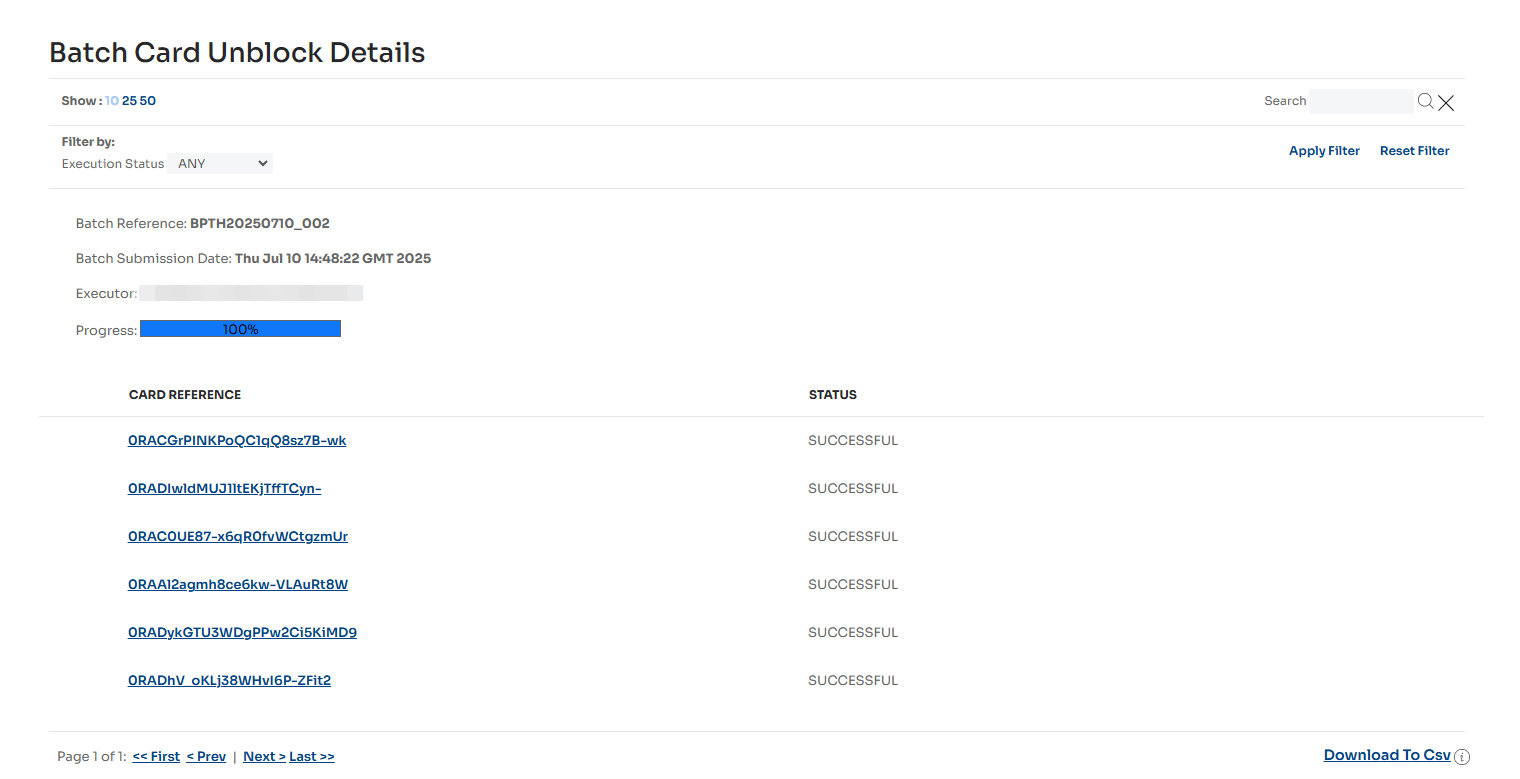
- The generated batch reference can be used later to search for reports.
For more information, see Viewing Card Batches.
Updating Spend Limit
You can update the spend limit only on active cards.
- Select Cards > Manage Cards to access the Manage Cards page.
To update the spend limit on a card:
- Select the ⋮ icon in the row that represents the card.
The action menu is displayed. - Select Update Spend Limit.
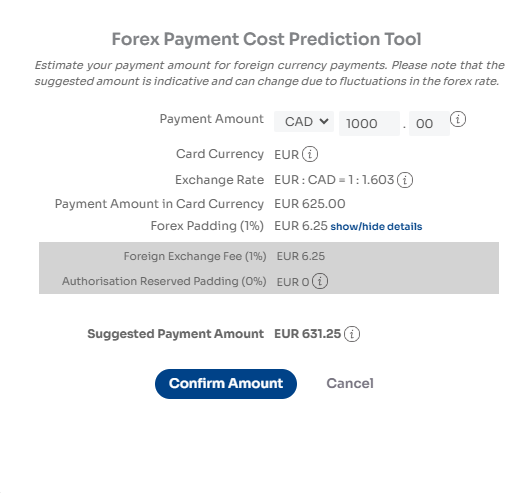
- Enter the new spend limit in the Projected Spend field.

📘 NOTE
The calculator icon next to the Projected Spend field opens the Forex Payment Cost Prediction Tool.
This tool helps you calculate the appropriate spend limit when making a payment in a currency different from the card’s currency (a forex transaction).Select the currency in which the payment will be made from the dropdown and enter the transaction amount.
Once you select the Confirm Amount button, the suggested spend limit will be automatically populated in the card's currency.
Closing Cards
You can close cards individually or as a batch.
- Select Cards > Manage Cards to access the Manage Cards page.
To close a single card:
- Select the ⋮ icon in the row that represents the card to be closed.
The action menu is displayed. - Select Close Card.
To close multiple cards at once:
- In the first column, select the checkboxes next to the cards you want to close.
- Select the Close button.
A batch reference is generated and the Batch Card Close Details report page is displayed.

- The generated batch reference can be used later to search for reports.
For more information, see Viewing Card Batches.
Viewing Authorisations
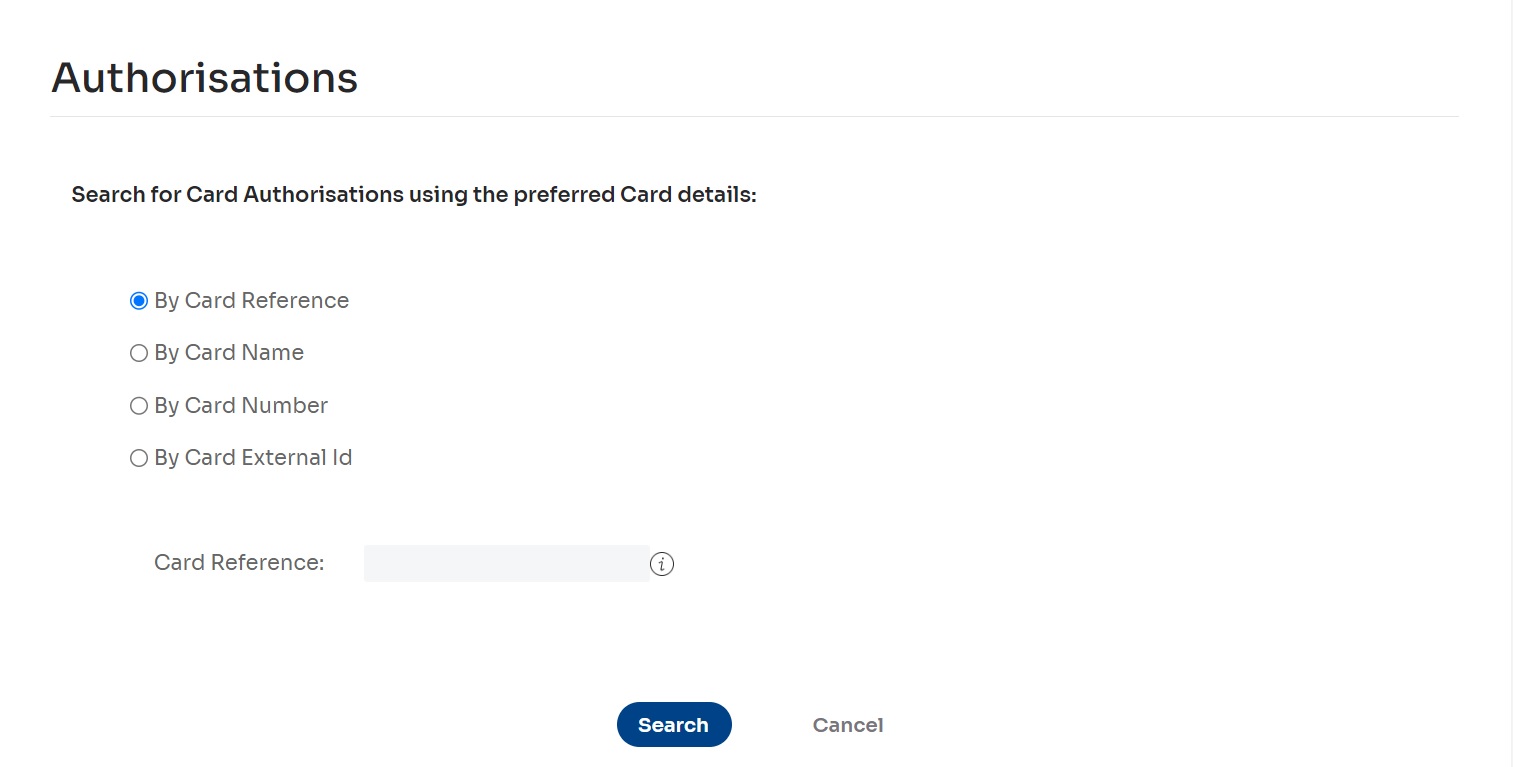
You can view a list of authorisations for a specific card on the Authorisations page.
- Select Cards > Authorisations.
The Authorisations page is displayed.
-
Enter your search criteria:
- To search using the unique external identifier of the card (recommended), select the By Card Reference radio button and enter the card reference in the Card Reference field.
📘 NOTE
You can find the Card Reference on the Manage Cards page in the Card Reference column, or on the Card Details page in the Card Reference field.
To copy the Card Reference, use your operating system's copy shortcut (e.g. Ctrl + C for Windows or Cmd + C for macOS).- To search using the unique name of the card, select the By Card Name radio button and enter the name in the Card Name field.
- To search using the card's unique number, select the By Card Number radio button and enter the number in the Card Number field.
- To search using the user-defined external ID of the card, select the By Card External ID radio button and enter the value in the Card External ID field.
-
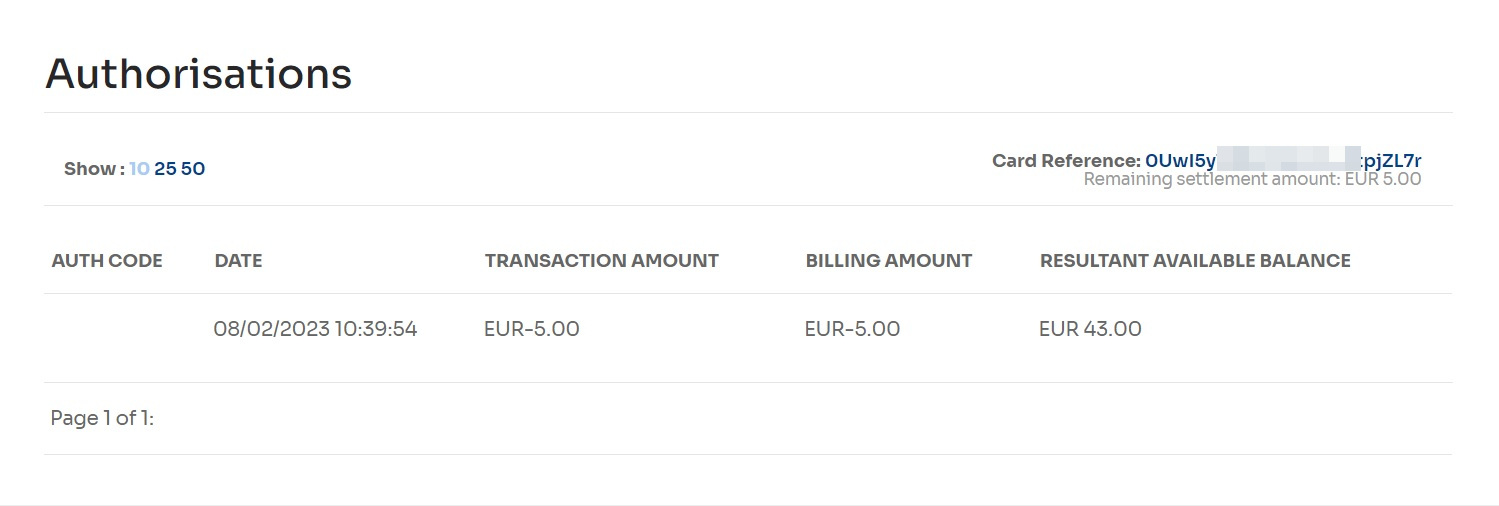
Select the Search button to display a list of authorisations for the selected virtual card.
The results will appear on the Authorisations page.
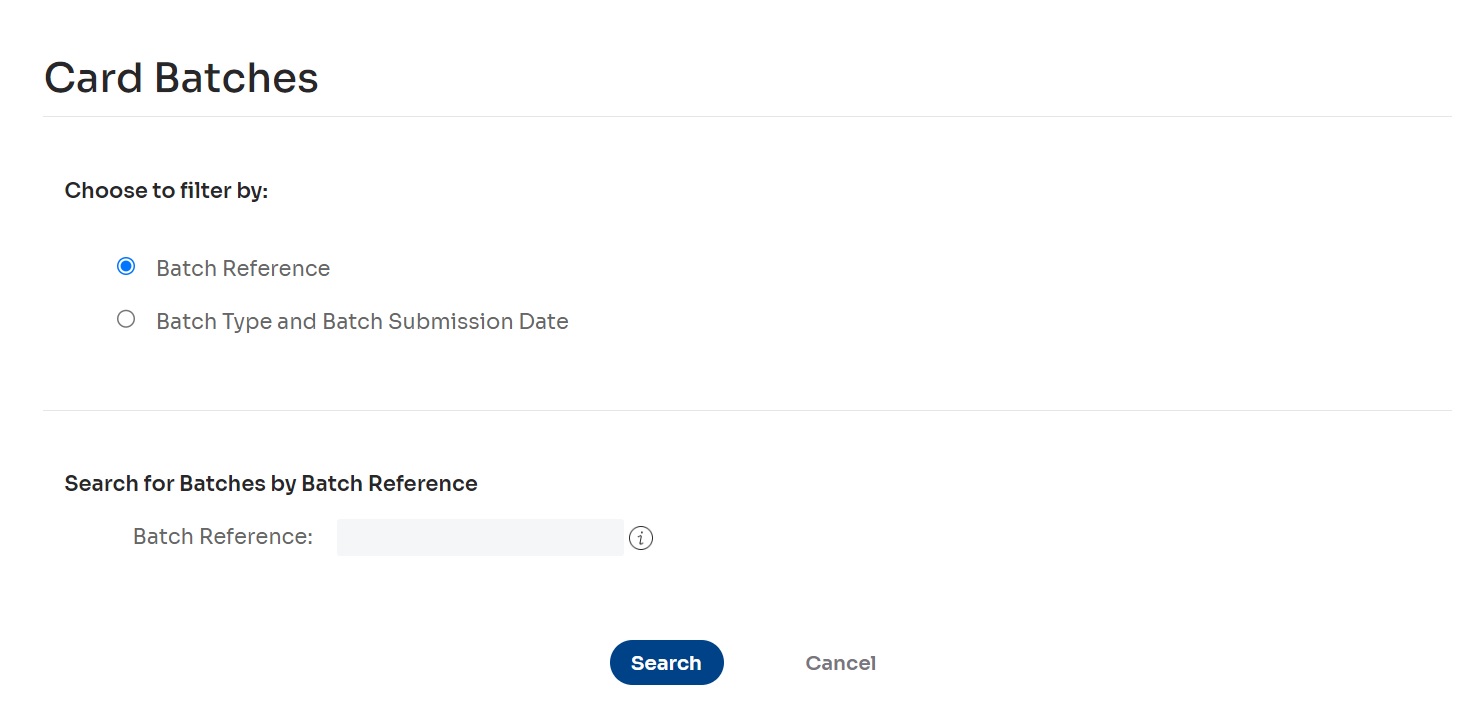
Viewing Card Batches
You can view all card actions performed using batches.
- Select Cards > Card Batches.
The Card Batches search page is displayed.
-
Select how you want to search for card batches:
- Select the Batch Reference radio button to search by batch references and enter the Batch Reference in the text field. (You can use wildcard symbols [*] in this field.)
- To search by batch type and submission date, select the Batch Type and Batch Submission Date radio buttons, choose the Batch Type, and select one of the radio buttons for Batch Submission Date options (for example, Yesterday), or enter/select dates for a Custom Range.
- To view a list of all card batches, leave the default settings.
-
Select the Search button.
The Batch Card Reports page displays batch operations that match your search criteria.
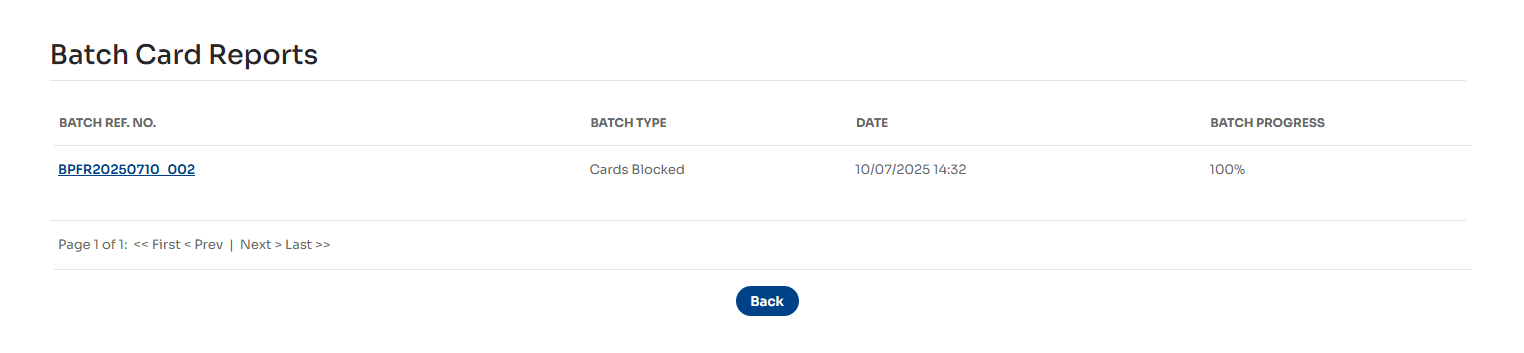
- Select any value in the Batch Ref. No. column to view the details of a batch.
A page displays the selected card batch. The page name and type depend on the batch operation type.